한 번에 끝내는 Spring 완.전.판 초격차 패키지 Online.
Part 5. Spring Security
Part 5. Spring Security
- Part 5. Spring Security
- Spring Security 기본 개념
- 개인 보안 노트 서비스 만들기
- 아키텍처
- Spring Security 적용하기
- JWT 기본개념
- Spring Security + JWT 구현하기
Spring Security 기본 개념
Spring Security 란?
Spring을 사용한다면 사실상 최선의 Security Framework
- Web 기반 Application에 보안적인 제한을 추가하기 위해 사용하는 Security Framework 중에 하나이다.
- Spring Security의 주된 목표는 rest api endpoint, mvc url, 정적 리소스와 같은 리소스들에 접근하려는 요청의 인증을 책임지는 것이다.
- Spring Security는 Spring 생태계와 호환성이 높고 커스텀이 매우 쉽다.
인증과 인가
- Spring Security를 한 문장으로 소개
- 스프링 생태계에서 인증과 인가라는 개념을 최대한 쉽고 유연하게 구현할 수 있도록 만들어진 framework
- 인증과 인가는 Spring Security의 개념들 중에 하나에 그치는게 아니라 Spring Security가 궁극적으로 이루고자 하는 목표이다
인증(Authentication)
- 인증은 사용자가 누구인지 확인하는 절차
- 다양한 인증 방법
- 방법 1. 모든 요청마다 나의 ID와 패스워드를 포함시켜서 요청한다
- 방법 2. 나의 ID와 패스워드를 서버에 주고 그 응답으로 아무나 해독이 불가능한 key를 받는다. 그 key를 모든 요청에 포함해서 보낸다.
- 방법 1. 모든 요청마다 나의 ID와 패스워드를 포함시켜서 요청한다
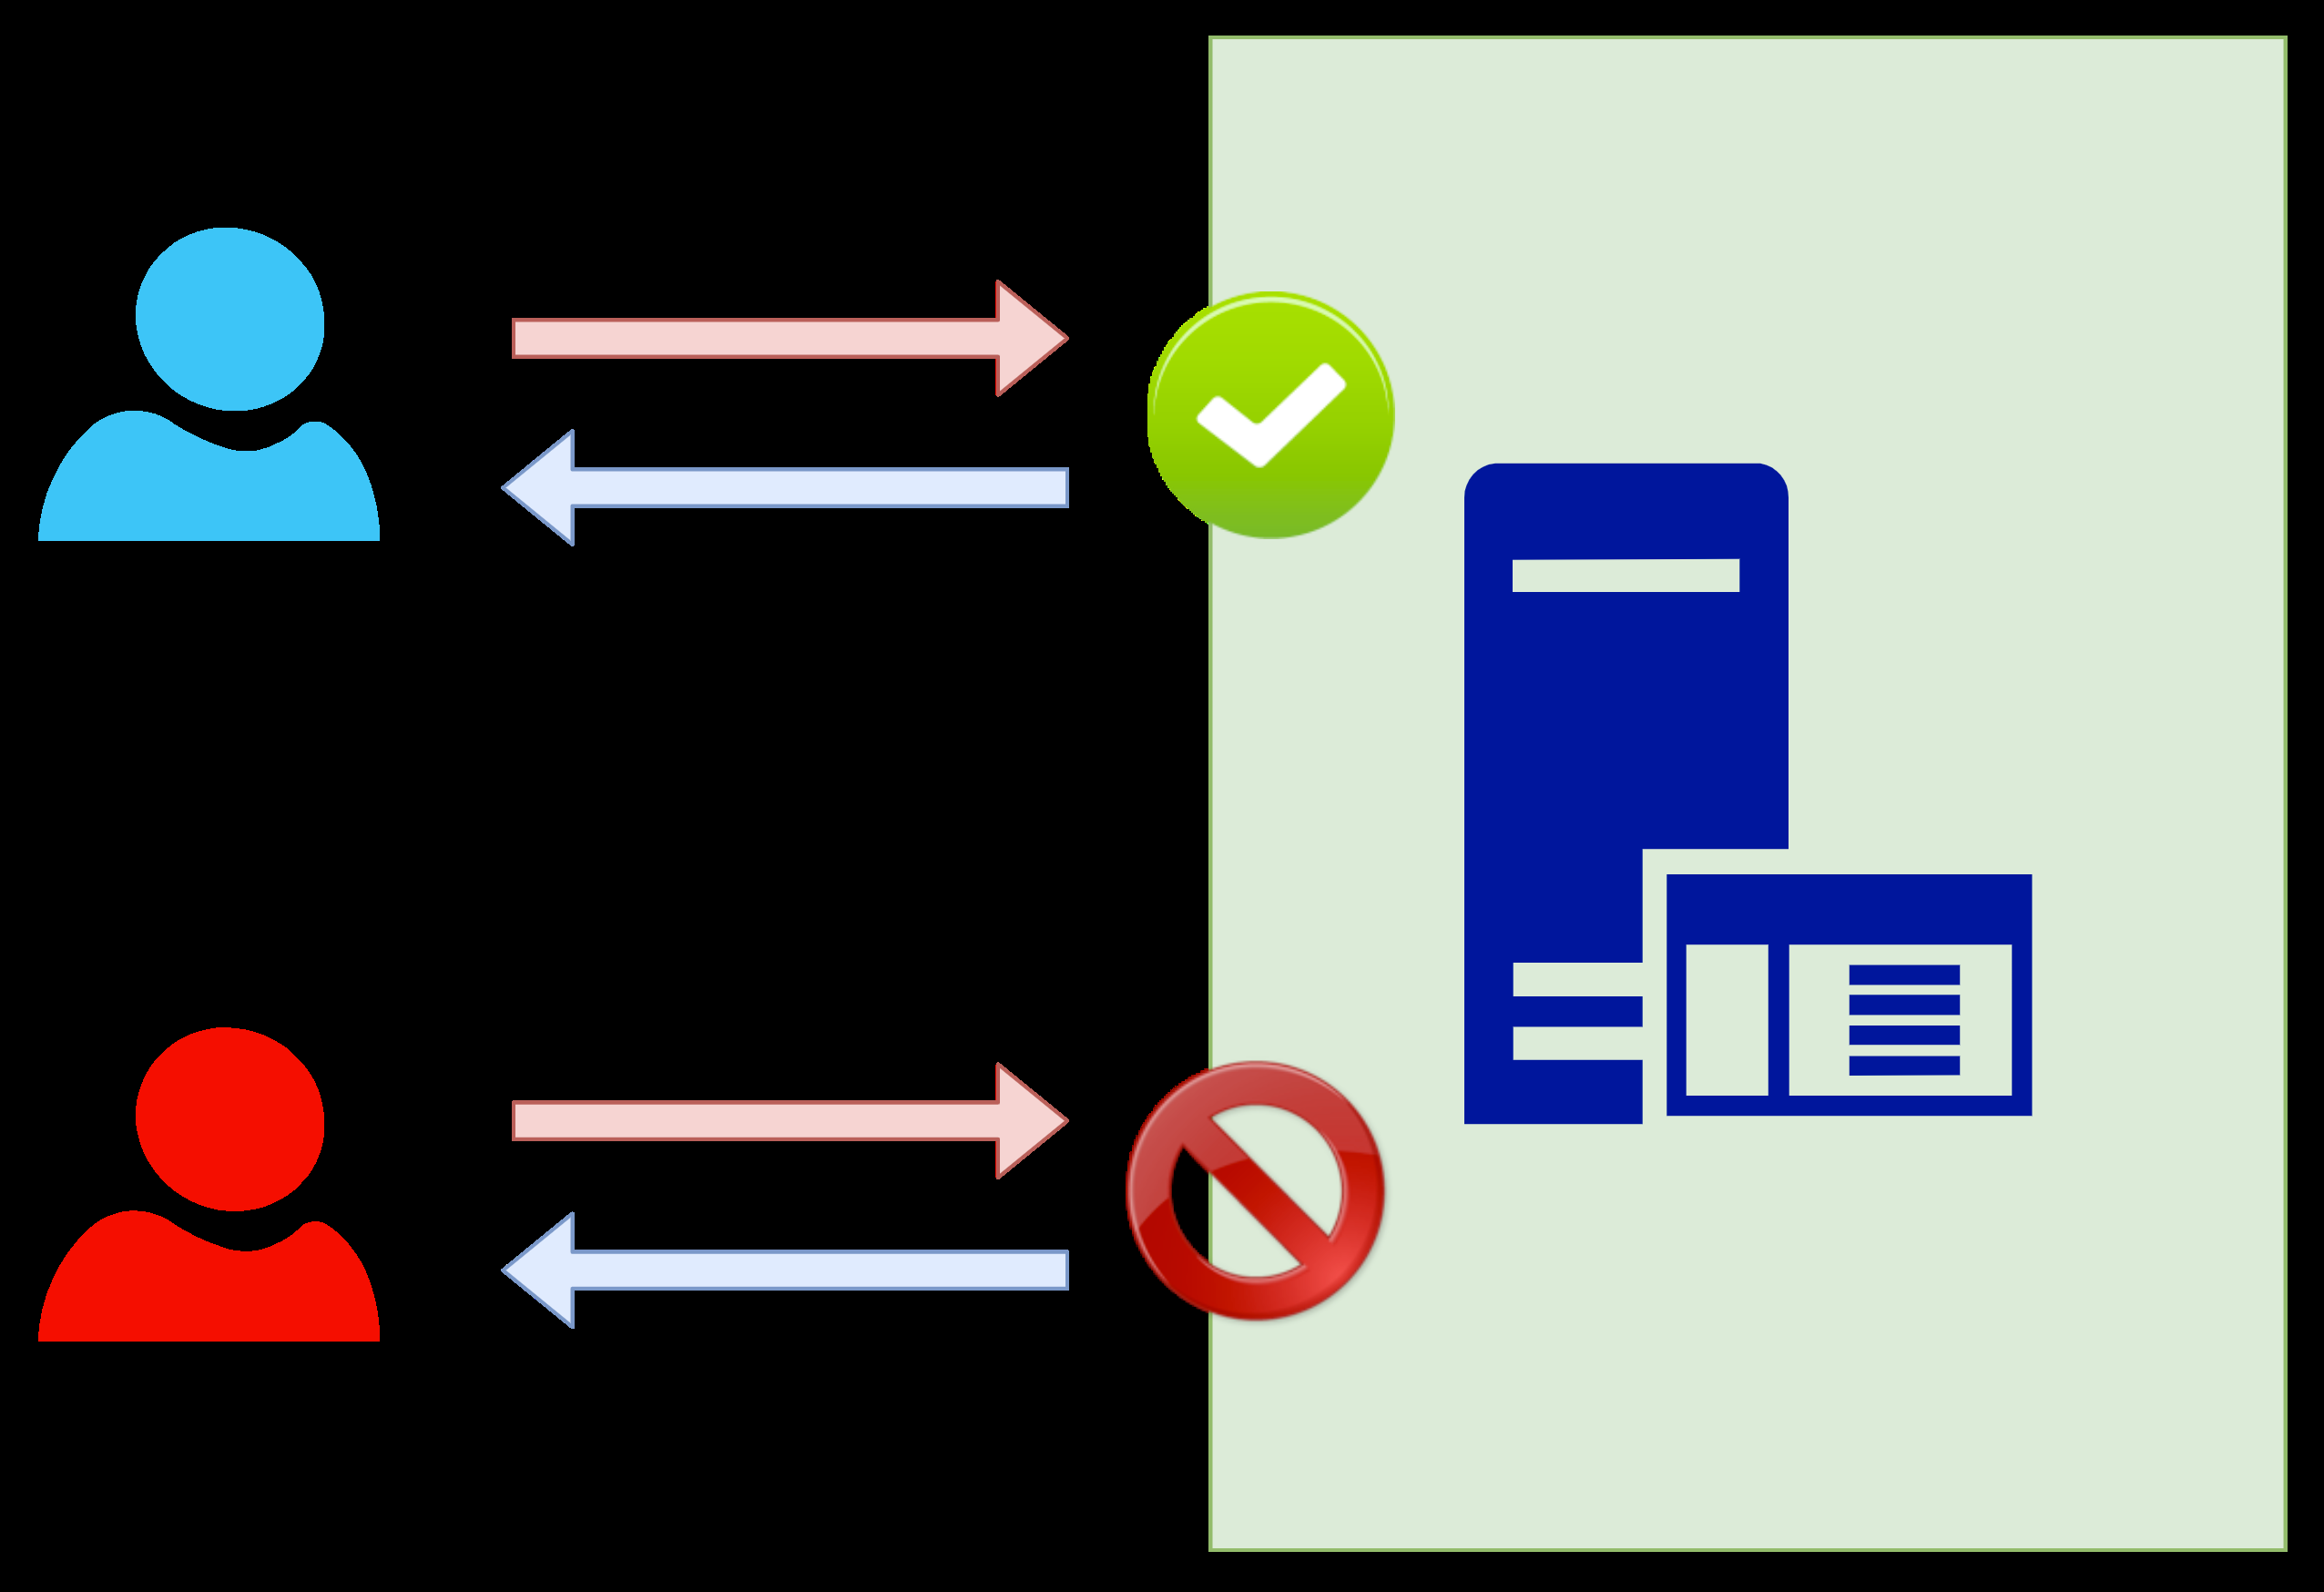
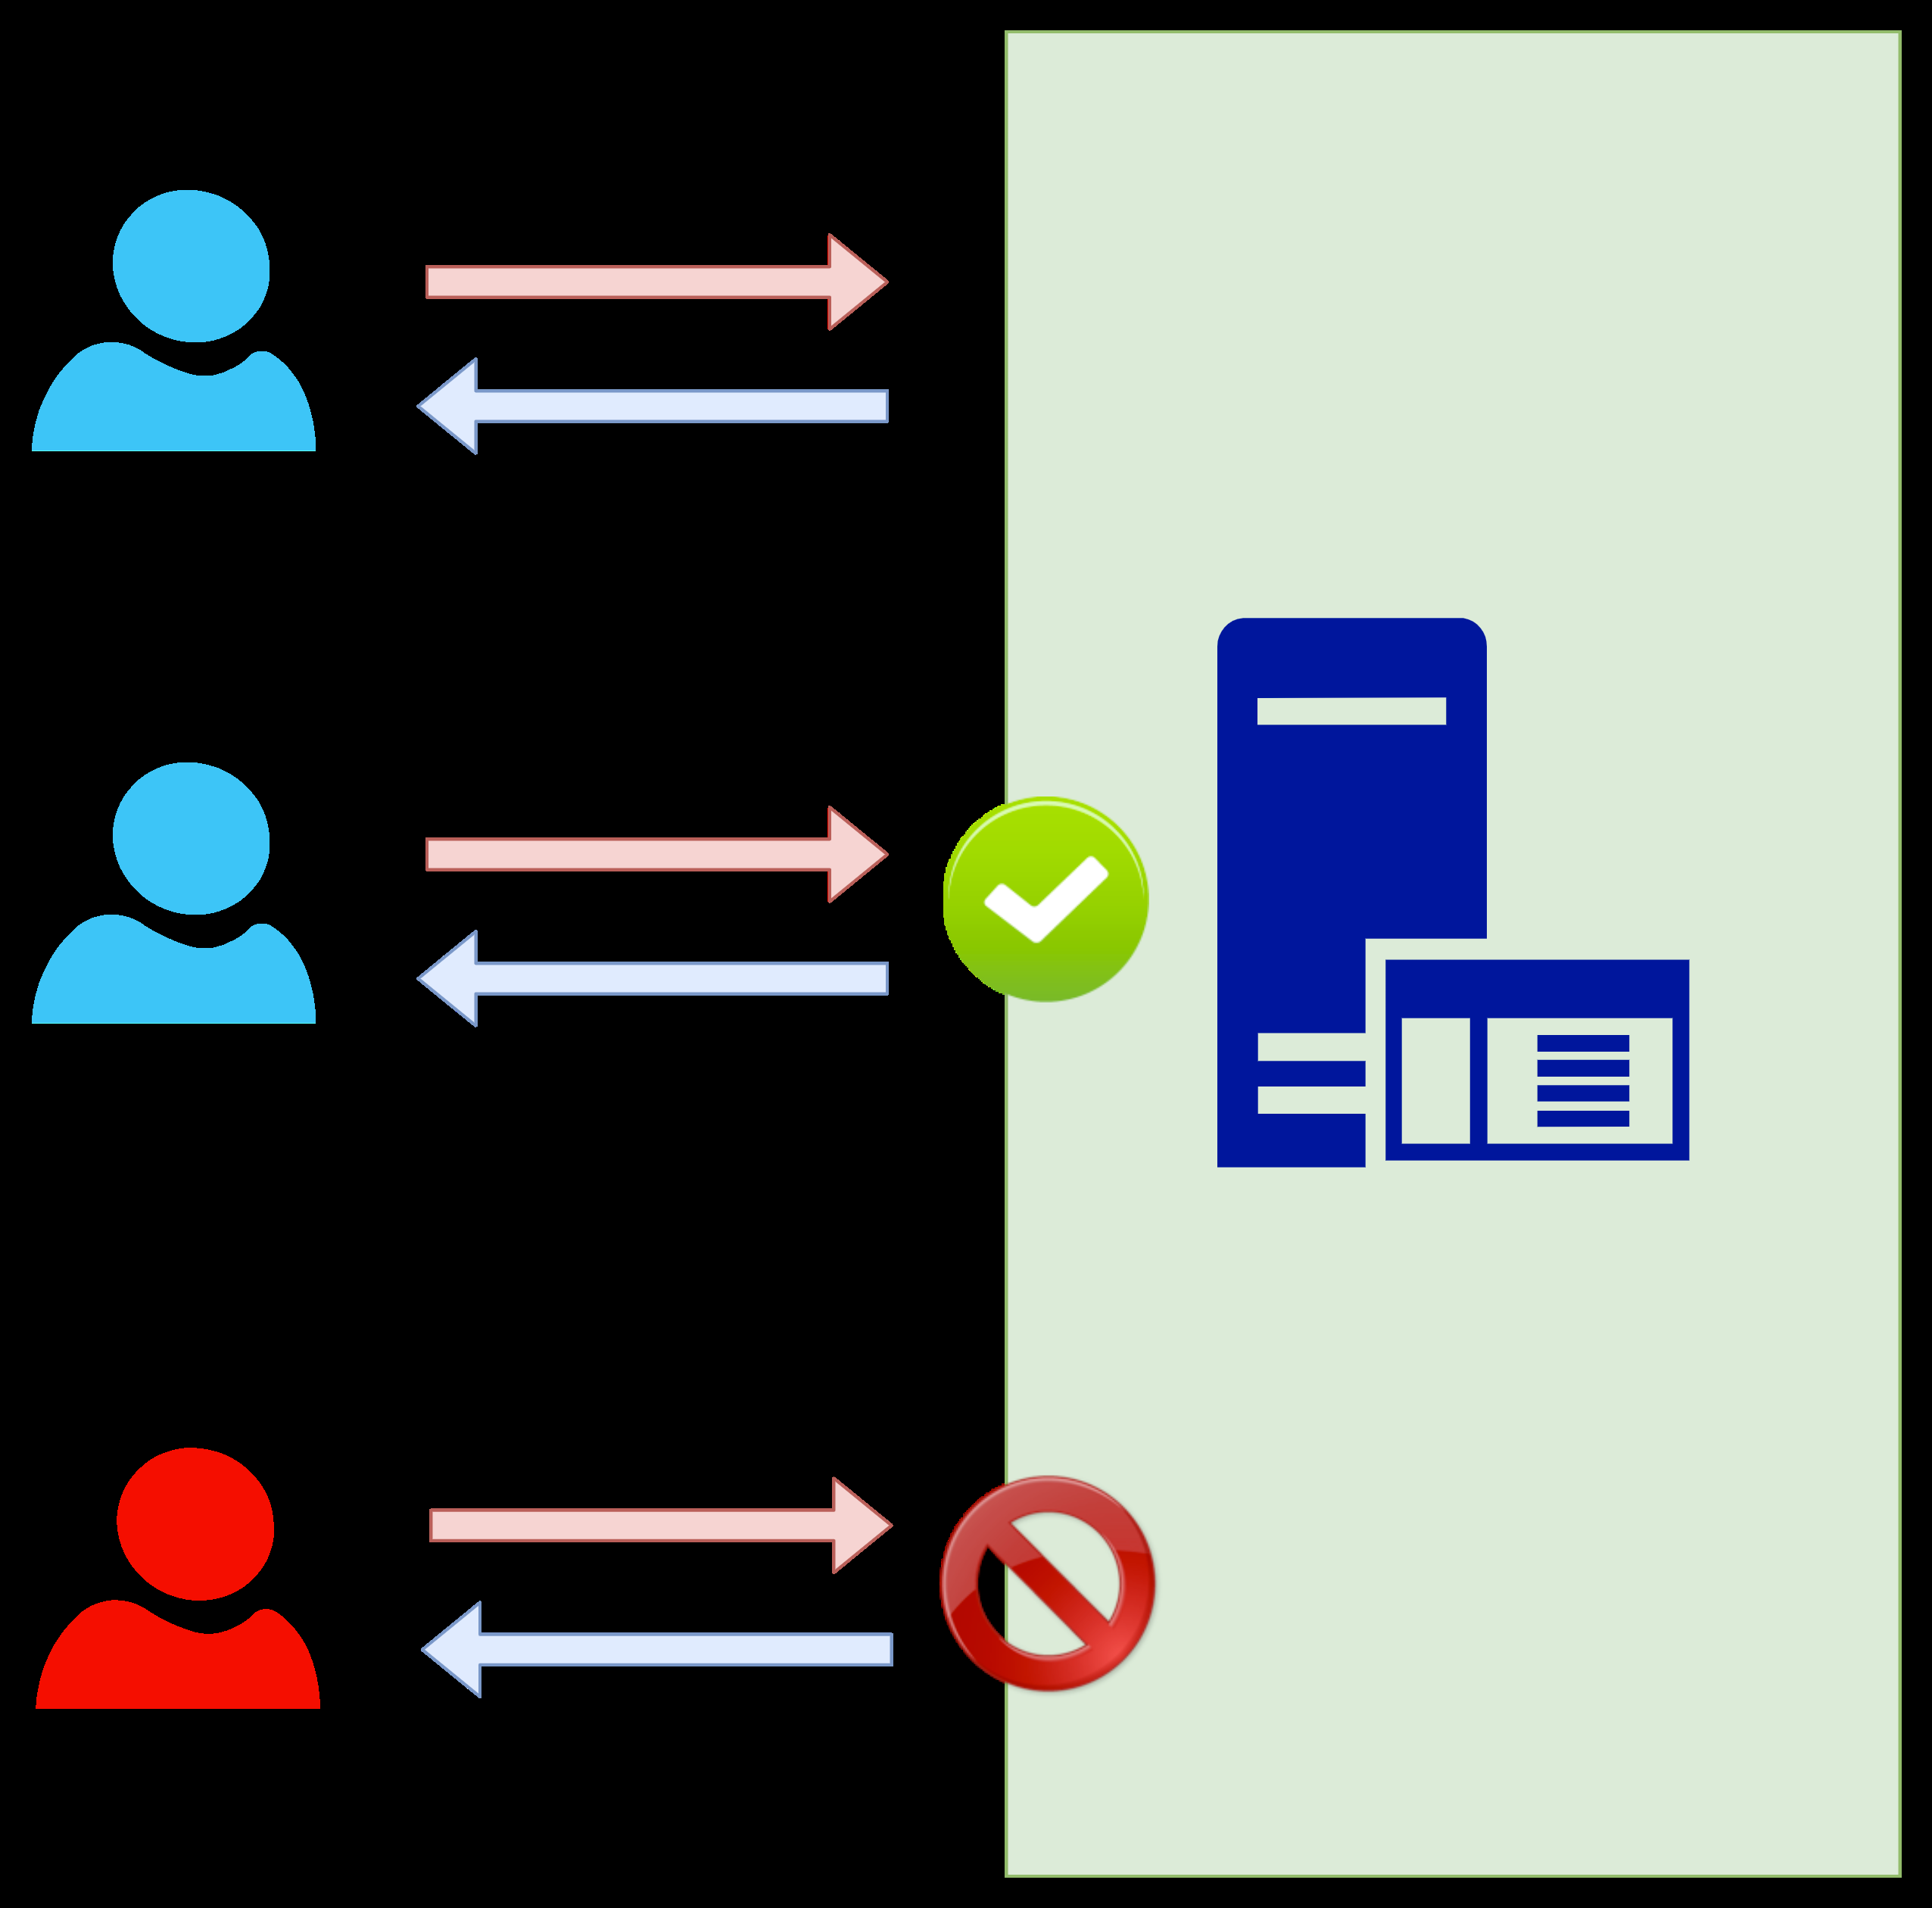
인가(Authorization)
- 인증이 되었다고 모든 작업을 다 할수 있는 것은 아니다
- 인가는 인증 이후에 리소스에 대한 권한 통제를 의미한다
- 클라이언트가 요청한 작업이 허가된 작업인지 확인하는 절차이다
개인 보안 노트 서비스 만들기
Thymeleaf
- Thymeleaf 의 특징
- 서버사이드 템플릿 엔진이다
- 클라이언트가 동적으로 그리는 방식이 아니라 서버가 모든 html을 그려서 내려주는 방식이다
- 서버에서 (유저마다 동적으로 달라질수 있는)데이터들을 구해서 미리 정의된 템플릿에 넣고 서버에서 직접 html을 그려서 클라이언트(브라우저)에게 전달한다
- th:text 와 같은 문법으로 html에 값을 주입하기 때문에 직관적이며 진입장벽이 낮다
- html로 작성하기 때문에 서버를 띄울 필요 없이 바로 브라우저에서 확인할 수 있다
Thymeleaf 문법
- ${name}
- 변수 name값 불러오기
- th:with
- 변수값 지정
- th:text
- text 수정
- th:block / th:if / th:unless
- if else 와 유사하다
- th:switch / th:case
- switch case와 유사하다
- th:each
- 반복문
- th:fragment
- 공통 layout을 나누고 사용한다
View 구현하기
- 권한에 따른 활성화 방법
- 인증 받은 모든 사람
- sec:authorize=”isAuthenticated()”
- 인증 받지 못한 사람
- sec:authorize=”!isAuthenticated()”
- 관리자만
- sec:authorize=”hasAnyRole(‘ROLE_ADMIN’)”
- 유저만
- sec:authorize=”hasAnyRole(‘ROLE_USER’)”
- 인증 받은 모든 사람
노트 서비스 로직 구현하기
- UserDetails
public interface UserDetails extends Serializable {
    Collection<? extends GrantedAuthority> getAuthorities();

    String getPassword();

    String getUsername();

    boolean isAccountNonExpired();

    boolean isAccountNonLocked();

    boolean isCredentialsNonExpired();

    boolean isEnabled();
}
- User
public class User implements UserDetails {
    private Long id;
    private String username;
    private String password;
    private String authority;
}
- UserService
public class UserService {
    /**
     * 유저 등록
     */
    public User signup(
            String username,
            String password
    ) {
    }

    /**
     * 관리자 등록
     */
    public User signupAdmin(
            String username,
            String password
    ) {
    }

    public User findByUsername(String username) {
    }
}
- SignUpController
@RequestMapping("/signup")
public class SignUpController {
    private final UserService userService;

    @GetMapping
    public String signup() {
        return "signup";
    }

    @PostMapping
    public String signup(
            @ModelAttribute UserRegisterDto userDto
    ) {
        userService.signup(userDto.getUsername(), userDto.getPassword());
        return "redirect:login";
    }
}
- Note
public class Note {
    private Long id;
    private String title;
    @Lob
    private String content;
    @ManyToOne(fetch = FetchType.LAZY)
    @JoinColumn(name = "USER_ID")
    private User u
}
- NoteService
public class NoteService {
    public List<Note> findByUser(User user) {
    }

    public Note saveNote(User user, String title, String content) {
    }

    public void deleteNote(User user, Long noteId) {
    }
}
- Notice
public class Notice {
    private Long id;
    private String title;
    @Lob
    private String content;
    @CreatedDate
    private LocalDateTime createdAt;
    @LastModifiedDate
    private LocalDateTime updatedAt;
}
- NoticeService
public class NoticeService {
    public List<Notice> findAll() {
    }

    public Notice saveNotice(String title, String content) {
    }

    public void deleteNotice(Long id) {
    }
}
- PasswordEncoderConfig
- Password를 암호화할 수 있는 Encoder를 Bean으로 등록
- SpringSecurityConfig
- Security 상세 설정
- Security의 어떤 기능을 끄고 킬것인지
- ‘개인노트’ 페이지는 유저만 접근가능
- ‘어드민’ 페이지는 관리자만 접근가능
- ‘공지사항’ 추가, 삭제는 관리자만 가능
- 로그인 & 로그아웃 설정
- 유저 관련 설정
- SpringSecurity가 유저 정보를 가져와야할 때 어떻게 가져올 수 있는지 정의
- Security 상세 설정
- MvcConfig
- WebMvcConfigurer
- ViewController 추가
- JpaAuditorConfig
- @EnableJpaAuditing 추가
- InitializeDefaultConfig
- 매번 회원가입하기 어려워서 기본 유저와 관리자 등록
- 유저등록, note 4개 등록
- 어드민등록, 공지사항 2개 등록
테스트 구현하기
MockMvc
- 프로젝트에서 컨트롤러 테스트를 할때 사용한다
- Spring-Test에 포함되어 있으면 Controller테스트를 할때 보편적으로 가장 많이 씁니다.
@SpringBootTest
@ActiveProfiles(profiles = "test")
@Transactional
class AdminControllerTest {
    private MockMvc mockMvc;

    @BeforeEach
    public void setUp(@Autowired WebApplicationContext applicationContext) {
        this.mockMvc = MockMvcBuilders.webAppContextSetup(applicationContext)
                .build();
    }

    @Test
    void getNoteForAdmin() throws Exception {
        mockMvc.perform(get("/admin"))
                .andExpect(status().is2xxSuccessful());
    }
}
- perform
- 요청을 전송하는 역할을 한다, 결과로 ResultActions를 반환한다
- get, post, put, delete
- perform() 엔에 넣어서 요청할 http method를 정한다. 인자로 경로를 적어준다
- params
- key value 파라미터를 전달할 수 있다
- 여러 개일 때는 params, 한개면 param을 사용
- andExpect
- 응답을 검증한다
- ex) andExpect(status().isBadRequest())
- status()
- 상태를 검증한다 isOk(200), isNotFound(404)
- view()
- 응답으로 받은 뷰 이름을 검증한다
- redirect()
- 응답으로 받은 redirect를 검증한다
- content()
- 응답 body를 거증한다
- andDo
- 일반적으로 해야할 일을 표현한다
- andDo(print()) 하면 결과를 print한다
- 스프링 시큐리티의 테스트는 일반적인 컨트롤러 테스트와 약간 다르다
- 그이유는 유저가 로그인을 한 상태로 서비스를 이용했다는 가정하에 테스트를 진행할 수 있어야 하기 때문이다
- 시큐리티 테스트를 사용하면 테스트를 실행 전에 원하는 유저를 마치 로그인한 것 처럼 설정할 수 있다
- 가짜 유저를 세팅하는 방법은 여러가지가 있지만 해당 프로젝트는 3가지 방법으로 구현했다
- @WithMockUse
- 특정 사용자가 존재하는 것처럼 테스트 진행할 수 있다
- @WithUserDetails
- 앞서 구현한 UserDetailsService 혹은 테스트를 위해 별도로 구현한 UserDetailsService를 참고해서 사용자를 가짜로 로그인할 수 있다.
- ~.with
- 직접 사용자를 mockMvc에 지정하는 방식이다
- @WithMockUse
아키텍처
Spring Security의 내부구조
SecurityContext context=SecurityContextHolder.getContext(); // Security Context
        Authentication authentication=context.getAuthentication(); // authentication
        authentication.getPrincipal();
        authentication.getAuthorities();
        authentication.getCredentials();
        authentication.getDetails();
        authentication.isAuthenticated();
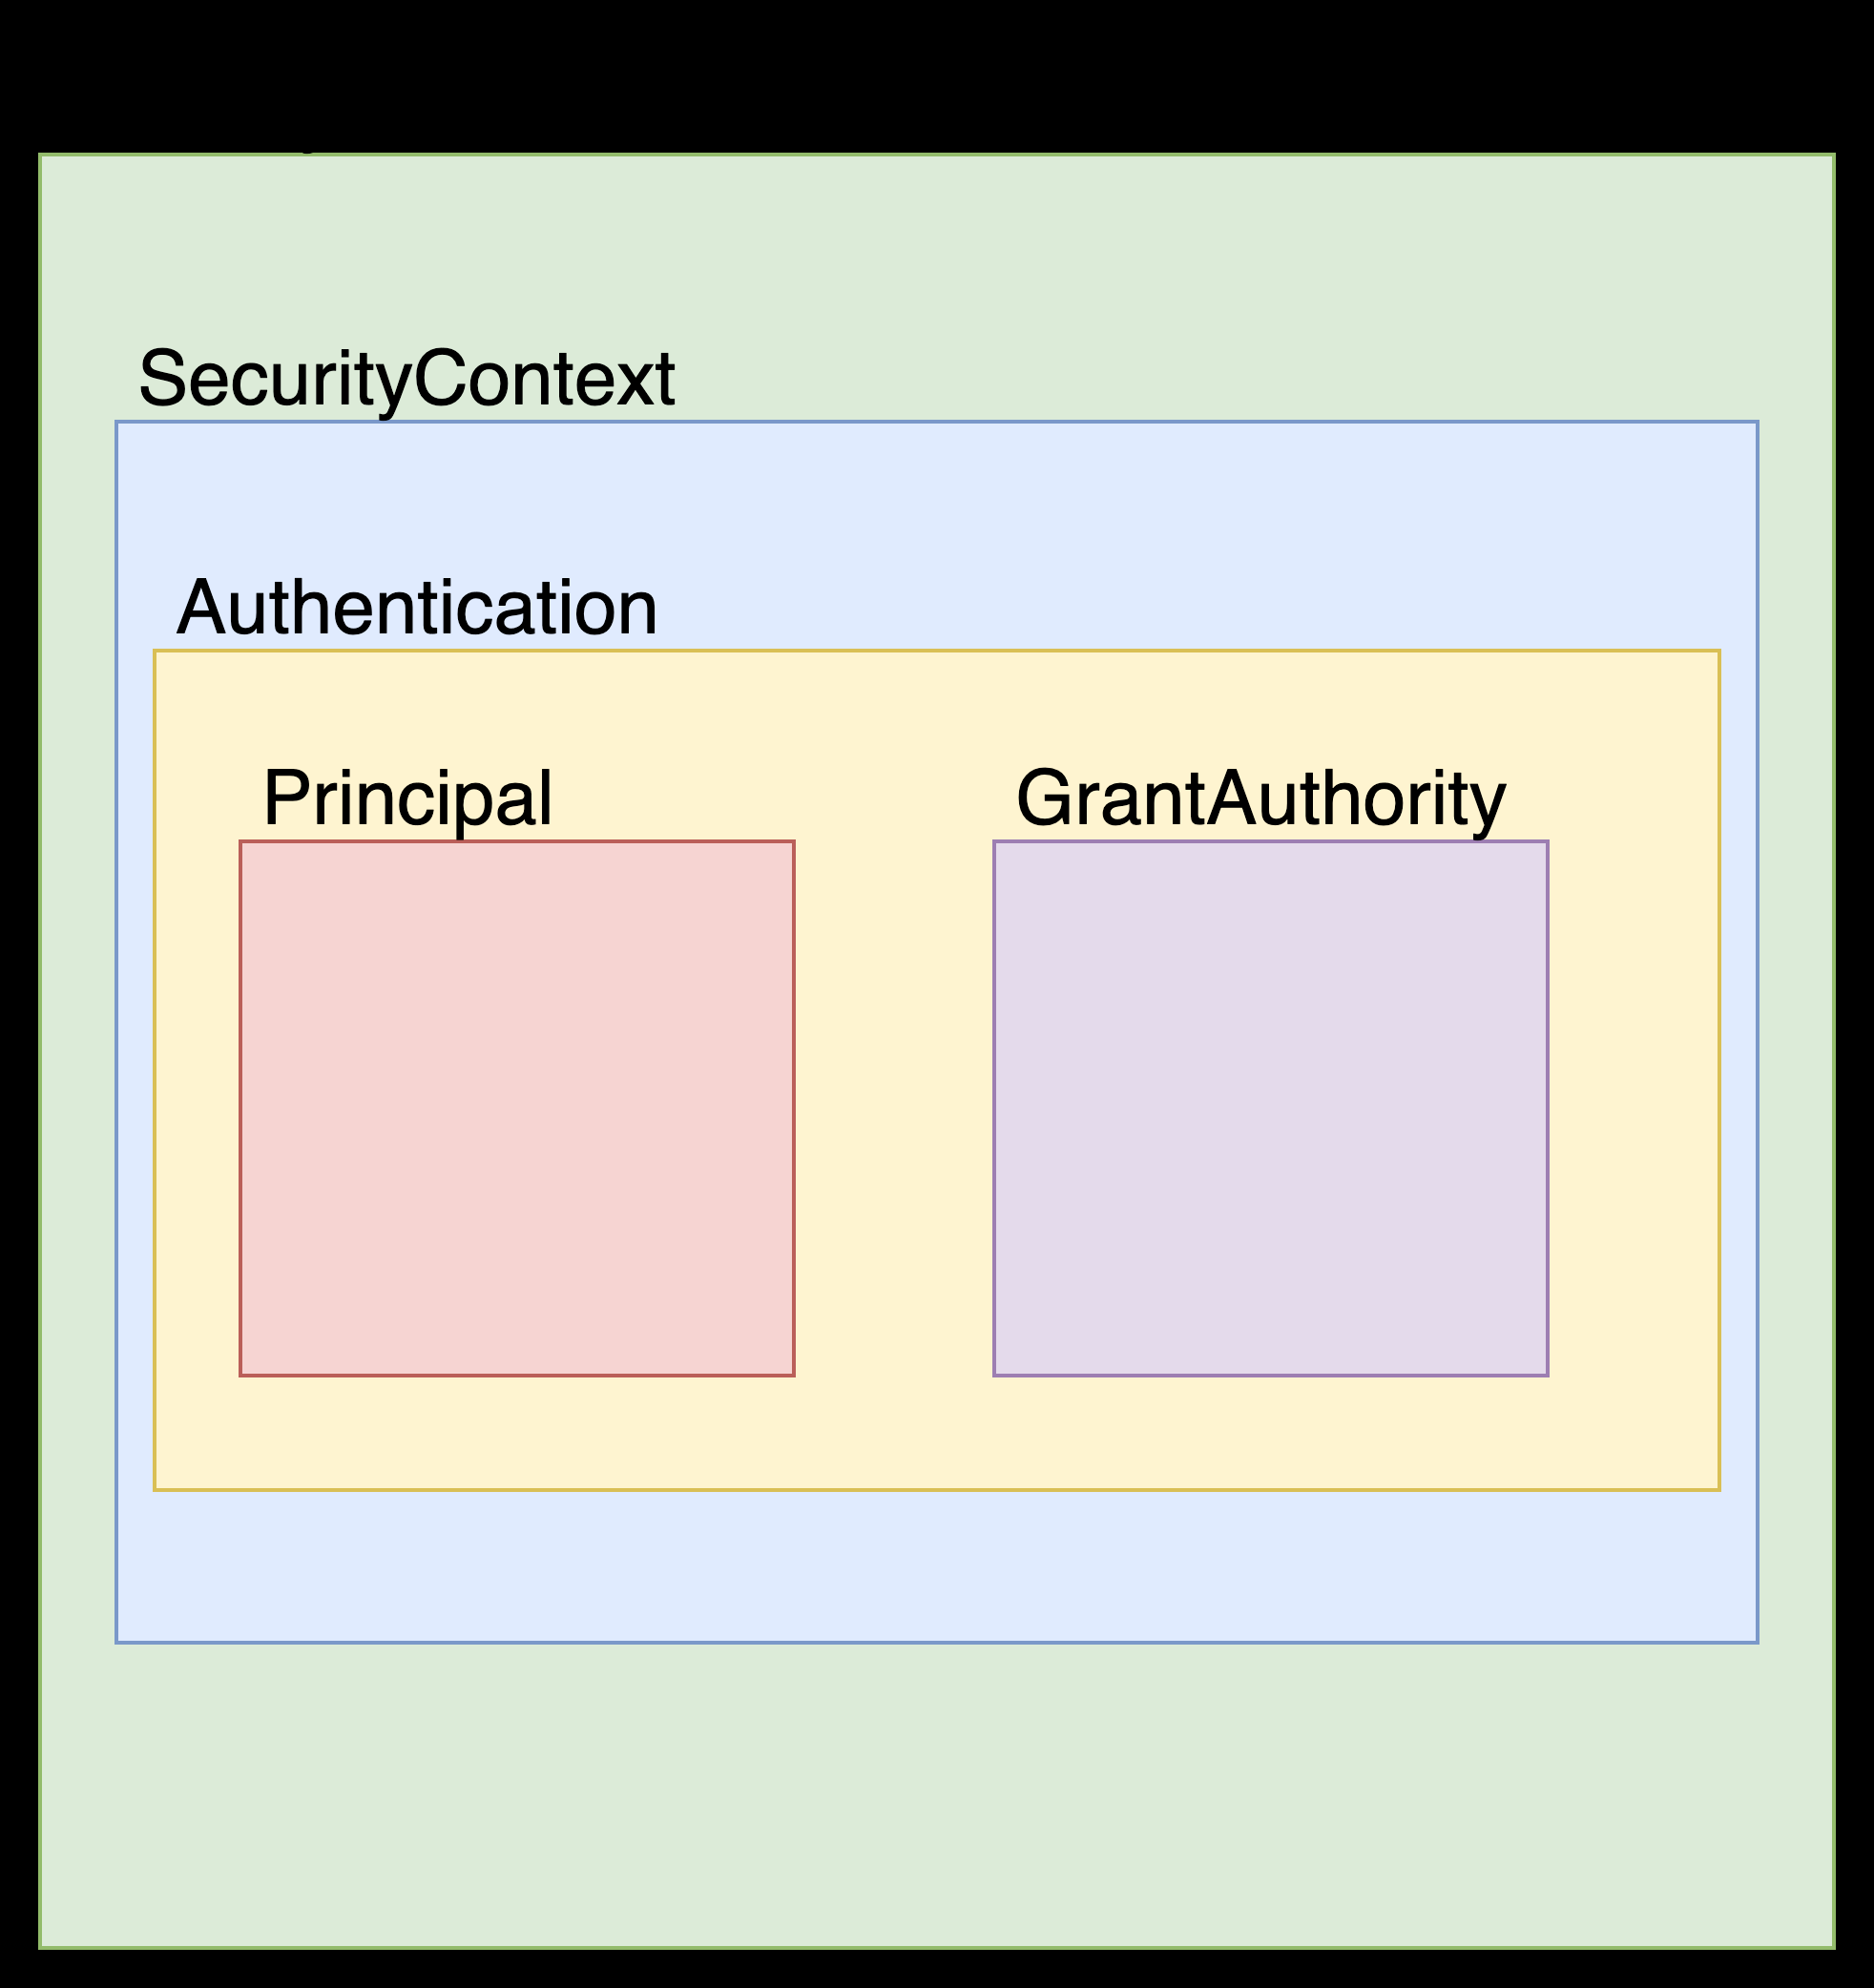
- SecurityContextHolder -> SecurityContext -> Authentication -> Principal & GrantAuthority
- SecurityContextHolder
- SecurityContextHolder는 SecurityContext를 제공하는 static 메소드(getContext)를 지원한다
- SecurityContext
- SecurityContext는 접근 주체와 인증에 대한 정보를 담고 있는 Context 이다
- 즉, Authentication 을 담고 있다
- Authentication
- Principal과 GrantAuthority를 제공한다
- 인증이 이루어 지면 해당 Authentication이 저장 된다
- Principal
- 유저에 해당하는 정보이다
- 대부분의 경우 Principal로 UserDetails를 반환한다
- GrantAuthority
- ROLE_ADMIN, ROLE_USER등 Principal이 가지고 있는 권한을 나타낸다
- prefix로 ‘ROLE_’ 이 붙는다
- 인증 이후에 인가를 할 때 사용된다
- 권한은 여러개 일수 있기 때문에 Collection
형태로 제공한다 - ex) ROLE_DEVELOPER, ROLE_ADMIN
ThreadLocal
- WebMVC 기반으로 프로젝트를 만든다는 가정하에 대부분의 경우에는 요청 1개에 Thread 1개가 생성된다
- 이때 ThreadLocal을 사용하면 Thread 마다 고유한 공간을 만들수 있고 그곳에 SecurityContext를 지정할 수 있다
- 그러나 ThreadLocal만 강제로 사용해야하는 것은 아니며 원하면 SecurityContext 공유 전략을 바꿀 수 있다
- MODE_THREADLOCAL
- ThreadLocalSecurityContextHolderStrategy를 사용한다
- ThreadLocal을 사용하여 같은 Thread안에서 SecurityContext를 공유한다
- 기본 설정 모드이다
- MODE_INHERITABLETHREADLOCAL
- InheritableThreadLocalSecurityContextHolderStrategy를 사용한다
- InheritableThreadLocal을 사용하여 자식 Thread까지도 SecurityContext를 공유한다
- MODE_GLOBAL
- GlobalSecurityContextHolderStrategy를 사용한다
- Global로 설정되어 애플리케이션 전체에서 SecurityContext를 공유한다
- Spring Security의 기본적인 Security Context 관리 전략은 ThreadLocal을 사용하는 ThreadLocalSecurityContextHolderStrategy 이다
- 변수는 지역변수, 전역변수와 같은 유효한 Scope를 가진다 마찬가지로 ThreadLocal은 Thread마다 고유한 영역을 가지고 있는 곳에 저장된 변수로 각각의 Thread안에서 유효한 변수이다
- 일반적인 서버의 경우에는 외부로부터 요청이 오면 그 요청마다 Thread 1개가 할당된다, 따라서 ThreadLocal로 SecurityContext를 관리하게 되면 SecurityContext는 요청마다 독립적으로 관리될 수 있다
PasswordEncoder
Password를 안전하게 관리하자
Spring Security를 사용하면서 유저의 Password 를 관리해야할 필요가 있다
- Password를 관리할 때는 일단 두가지가 만족되어야한다
- 회원가입할 때 Password를 입력받으면 그 값을 암호화해서 저장해야한다
- 로그인할 때 입력받은 Password와 회원가입할 때의 Password를 비교할 수 있어야한다
- 이 두가지를 만족하기 위해서는 보통 해시 함수라는 알고리즘 방식을 이용한다
- 해시 함수 암호화는 비교적 쉽지만 복화화가 거의 불가능한 방식의 알고리즘이다
- 이것을 사용하면 아래와 같은 방식으로 password를 관리할 수 있다
- 회원가입할 때 password를 해시함수로 암호화해서 저장한다
- 로그인할 때 password가 들어오면 같은 해시함수로 암호화한다
- 저장된 값을 불러와서 2번의 암호화된 값과 비교한다
- 동일하면 같은 암호로 인지한다
- PasswordEncoder 내용
public interface PasswordEncoder {
    /**
     * @param rawPassword 평문 패스워드
     * @return 암호화된 패스워드
     */
    String encode(CharSequence rawPassword);

    /**
     *
     * @param rawPassword 평문 패스워드
     * @param encodedPassword 암호화된 패스워드
     * @return rawPassword를 암호화한 값과 encodedPassword의 일치여부
     */
    boolean matches(CharSequence rawPassword, String encodedPassword);
}
- 다양한 PasswordEncoder 전략이 있는데 그 종류는 아래와 같다
| 종류 | 예시 |
|---|---|
| NoOpPasswordEncoder | {noop}password |
| BcryptPasswordEncoder | {bcrypt}$2a$10$dXJ3SW6G7P50lGmMkkmwe.20cQQubK3.HZWzG3YB1tlRy.fqvM/BG |
| StandardPasswordEncoder | {sha256}97cde38028ad898ebc02e690819fa220e88c62e0699403e94fff291cfffaf8410849f27605abcbc0 |
| Pbkdf2PasswordEncoder | {pbkdf2}5d923b44a6d129f3ddf3e3c8d29412723dcbde72445e8ef6bf3b508fbf17fa4ed4d6b99ca763d8dc |
| SCryptPasswordEncoder | {scrypt}$e0801$8bWJaSu2IKSn9Z9kM+TPXfOc/9bdYSrN1oD9qfVThWEwdRTnO7re7Ei+fUZRJ68k9lTyuTeUp4of4g24hHnazw==$OAOec05+bXxvuu/1qZ6NUR+xQYvYv7BeL1QxwRpY5Pc= |
- 스프링 시큐리티는 DelegatingPasswordEncoder라는 푠의 모든 PasswordEncoder를 선택할 수 있는 대표 PasswordEncoder를 따로 만들어서 사용하고 있다
- 예시를 보면 뒤쪽의 난해한 문자들은 암호화된 값이다
- {noop} {bcrypt} {sha256} {pbkdf2} {scrypt} 같은 앞의 단어는 DelegatingPasswordEncoder에서 어떤 PasswordEncoder를 선택했는지 알려주기 위해서 앞에 암호화 방식을 표현하고 있다
- 그렇기 때문에 어떤 암호화는 bcrypt로 암호화되고 다른 암호는 sha256 되었다고 하더라도 DelegatingPasswordEncoder는 둘다 지원할 수 있다
- 참고로 DelegatingPasswordEncoder는 인코딩 전략으로 Bcrypt를 기본 Encoder로 사용하고 있다
- PasswordEncoder 종류
- NoOpPasswordEncoder
- 암호화하지 않고 평문으로 사용한다
- password가 그대로 노출되기 때문에 현재는 deprecated 되었고 사용하지 않기를 권장한다
- BcryptPasswordEncoder
- Bcrypt 해시 함수를 사용한 PasswordEncoder 이다
- Bcrypt는 애초부터 패스워드 저장을 목적으로 설계되었다
- Password를 무작위로 여러번 시도하여 맞추는 해킹을 방지하기 위해 암호를 확인할 때 의도적으로 느리게 설정되어있다
- BcryptPasswordEncoder는 강도를 설정할 수 있는데 강도가 높을수록 오랜 시간이 걸린다 (보통은 1초이상 걸리게 설정)
- Pbkdf2PasswordEncoder
- Pbkdf2는 NIST(National Institute of Standards and Technology, 미국표준기술연구소)에 의해서 승인된 알고리즘이고, 미국 정부 시스템에서도 사용한다
- ScryptPasswordEncoder
- Scrypt는 Pbkdf2와 유사하다
- 해커가 무작위로 password를 맞추려고 시도할 때 메모리 사용량을 늘리거나 반대로 메모리 사용량을 줄여서 느린 공격을 실행할 수밖에 없도록 의도적인 방식을 사용한다
- 따라서 공격이 매우 어렵고 Pbkdf2보다 안전하다고 평가받는다
- 보안에 아주 민감한 경우에 사용할 수 있다
- NoOpPasswordEncoder
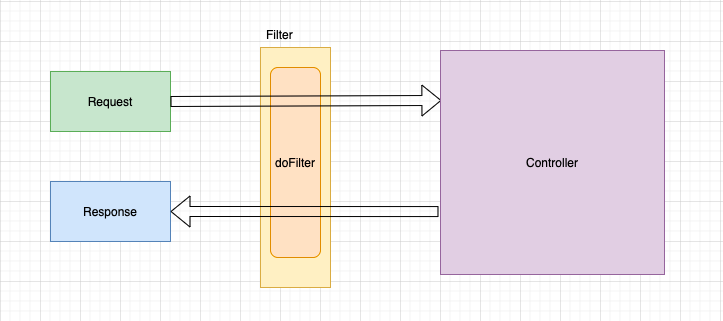
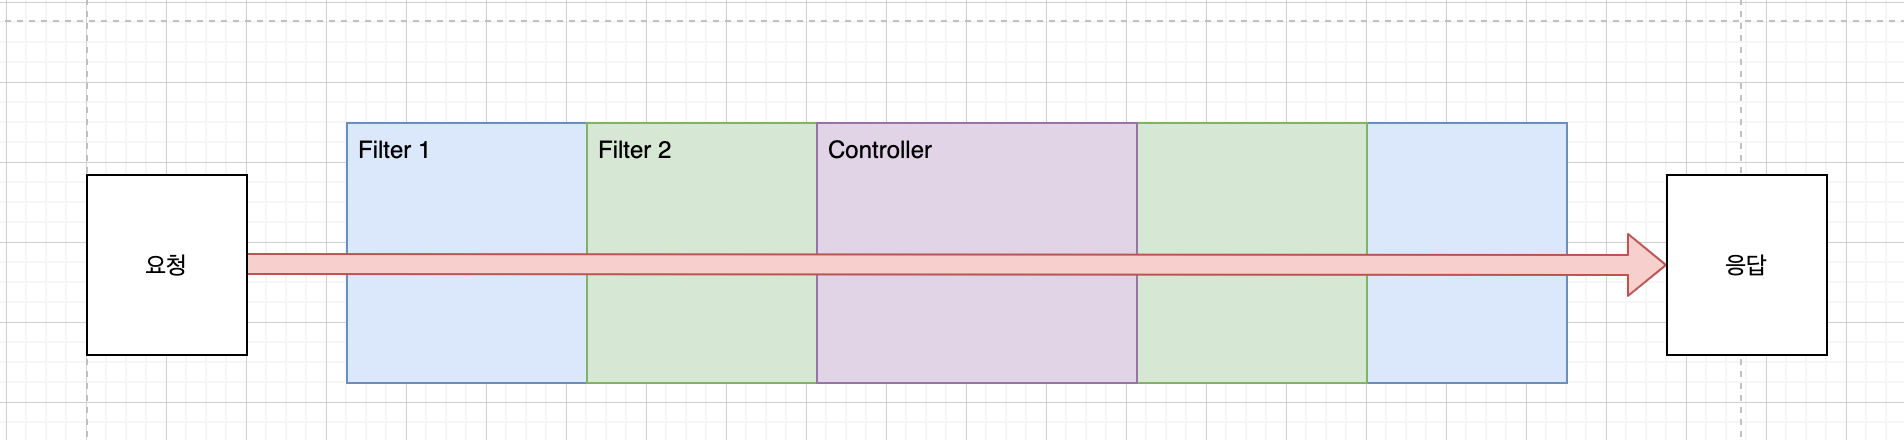
Security Filter
- Spring Security의 동작은 사실상 Filter로 동작한다고 해도 무방하다
- 다양한 필터들이 존재하는데 이 Filter들은 각자 다른 기능을 가지고 있다
- 이런 Filter들은 제외할 수도 있고 추가할 수도 있다
- 필터에 동작하는 순서를 정해주서 원하는대로 유기적으로 동작할 수 있다.
- 필터의 종류는 많지만 많이 쓰이는 필터는 아래와 같다
- SecurityContextPersistenceFilter
- BasicAuthenticationFilter
- UsernamePasswordAuthenticationFilter
- CsrfFilter
- RememberMeAuthenticationFilter
- AnonymousAuthenticationFilter
- FilterSecurityInterceptor
- ExceptionTranslationFilter
Filter
- SecurityContextPersistenceFilter는 GenericFilterBean을 상속하고 있고 GenericFilterBean는 Filter를 상속하고 있다
- 즉, SecurityContextPersistenceFilter는 Filter를 구현한다
- SpringSecurity에는 다양한 Filter들이 존재하는데 그중에 하나가 SecurityContextPersistenceFilter 일 뿐이다
- Filter들의 종류와 기능을 알기에 앞서 Filter가 무엇인지 파악하자
- 필터는 요청이나 응답 또는 둘 다에 대해 필터링 작업을 수행하는 개체이다
- 필터는 doFilter 메소드에서 필터링을 수행한다
- 즉, Filter는 doFilter를 구현해야한다
public interface Filter {
    public default void init(FilterConfig filterConfig) throws ServletException {
    }

    public void doFilter(ServletRequest request, ServletResponse response, FilterChain chain) throws IOException, ServletException;

    public default void destroy() {
    }
}
- 간단하게 생각하면 요청 전, 응답 후 어떤 작업을 하도록 하는게 Filter라고 생각하면 된다
- Filter가 여러개인 상황이면 아래처럼 동작한다. 마지막 순서가 필터 안쪽부터 첫번째 필터의 가장 밖까지 감싸고 있는 형태라 볼수 있다
- 다양한 필터들과 그 필터들의 동작 순서는 FilterChainProxy Class에서 doFilterInternal에 break point를 걸어서 디버깅해보면 알 수 있다
- Filter의 순서는 어디에 정의되었는지 FilterOrderRegistration을 보면 알수 있다
- Filter들은 100번 부터 시작해서 100씩 증가된다
- 즉, 100이 가장먼저 200,300,400 이런 순서대로 필터가 적용된다
- 굳이 이렇게 만든 이유는 100이라는 공백 사이사이 커스텀 필터를 넣을 수 있도록 한 것이다
private static final int INITIAL_ORDER=100;

private static final int ORDER_STEP=100;

private final Map<String, Integer> filterToOrder=new HashMap<>();

        FilterOrderRegistration(){
        Step order=new Step(INITIAL_ORDER,ORDER_STEP);
        put(ChannelProcessingFilter.class,order.next());
        order.next(); // gh-8105
        put(WebAsyncManagerIntegrationFilter.class,order.next());
        put(SecurityContextPersistenceFilter.class,order.next());
SecurityContextPersistenceFilter
- SecurityContextPersistenceFilter는 보통 두번째로 실행되는 필터이다
- (첫번째로 실행되는 필터는 Async 요청에 대해서도 SecurityContext를 처리할수 있도록 해주는 WebAsyncManagerIntegrationFilter 이다)
- SecurityContextPersistenceFilter는 SecurityContext를 찾아와서 SecurityContextHolder에 넣어주는 역활을 하는 Filter이다
- 만약 SecurityContext를 찾았는데 없다면 그냥 새로 하나 만들어 준다
public class SecurityContextPersistenceFilter extends GenericFilterBean {
    private void doFilter(HttpServletRequest request, HttpServletResponse response, FilterChain chain)
            throws IOException, ServletException {
        SecurityContext contextBeforeChainExecution = this.repo.loadContext(holder);
        try {
            SecurityContextHolder.setContext(contextBeforeChainExecution);
            chain.doFilter(holder.getRequest(), holder.getResponse());
        } finally {
            SecurityContext contextAfterChainExecution = SecurityContextHolder.getContext();
// Crucial removal of SecurityContextHolder contents before anything else.
            SecurityContextHolder.clearContext();
            this.repo.saveContext(contextAfterChainExecution, holder.getRequest(), holder.getResponse());
        }
    }
}
HttpSession
- SecurityContextPersistenceFilter는 SecurityContext가 있으면 그걸 사용가져오고 없으면 새로 만든다
- 가져올수 있는 방법은 많지만, 기본적으로 HttpSession에서 가져온다
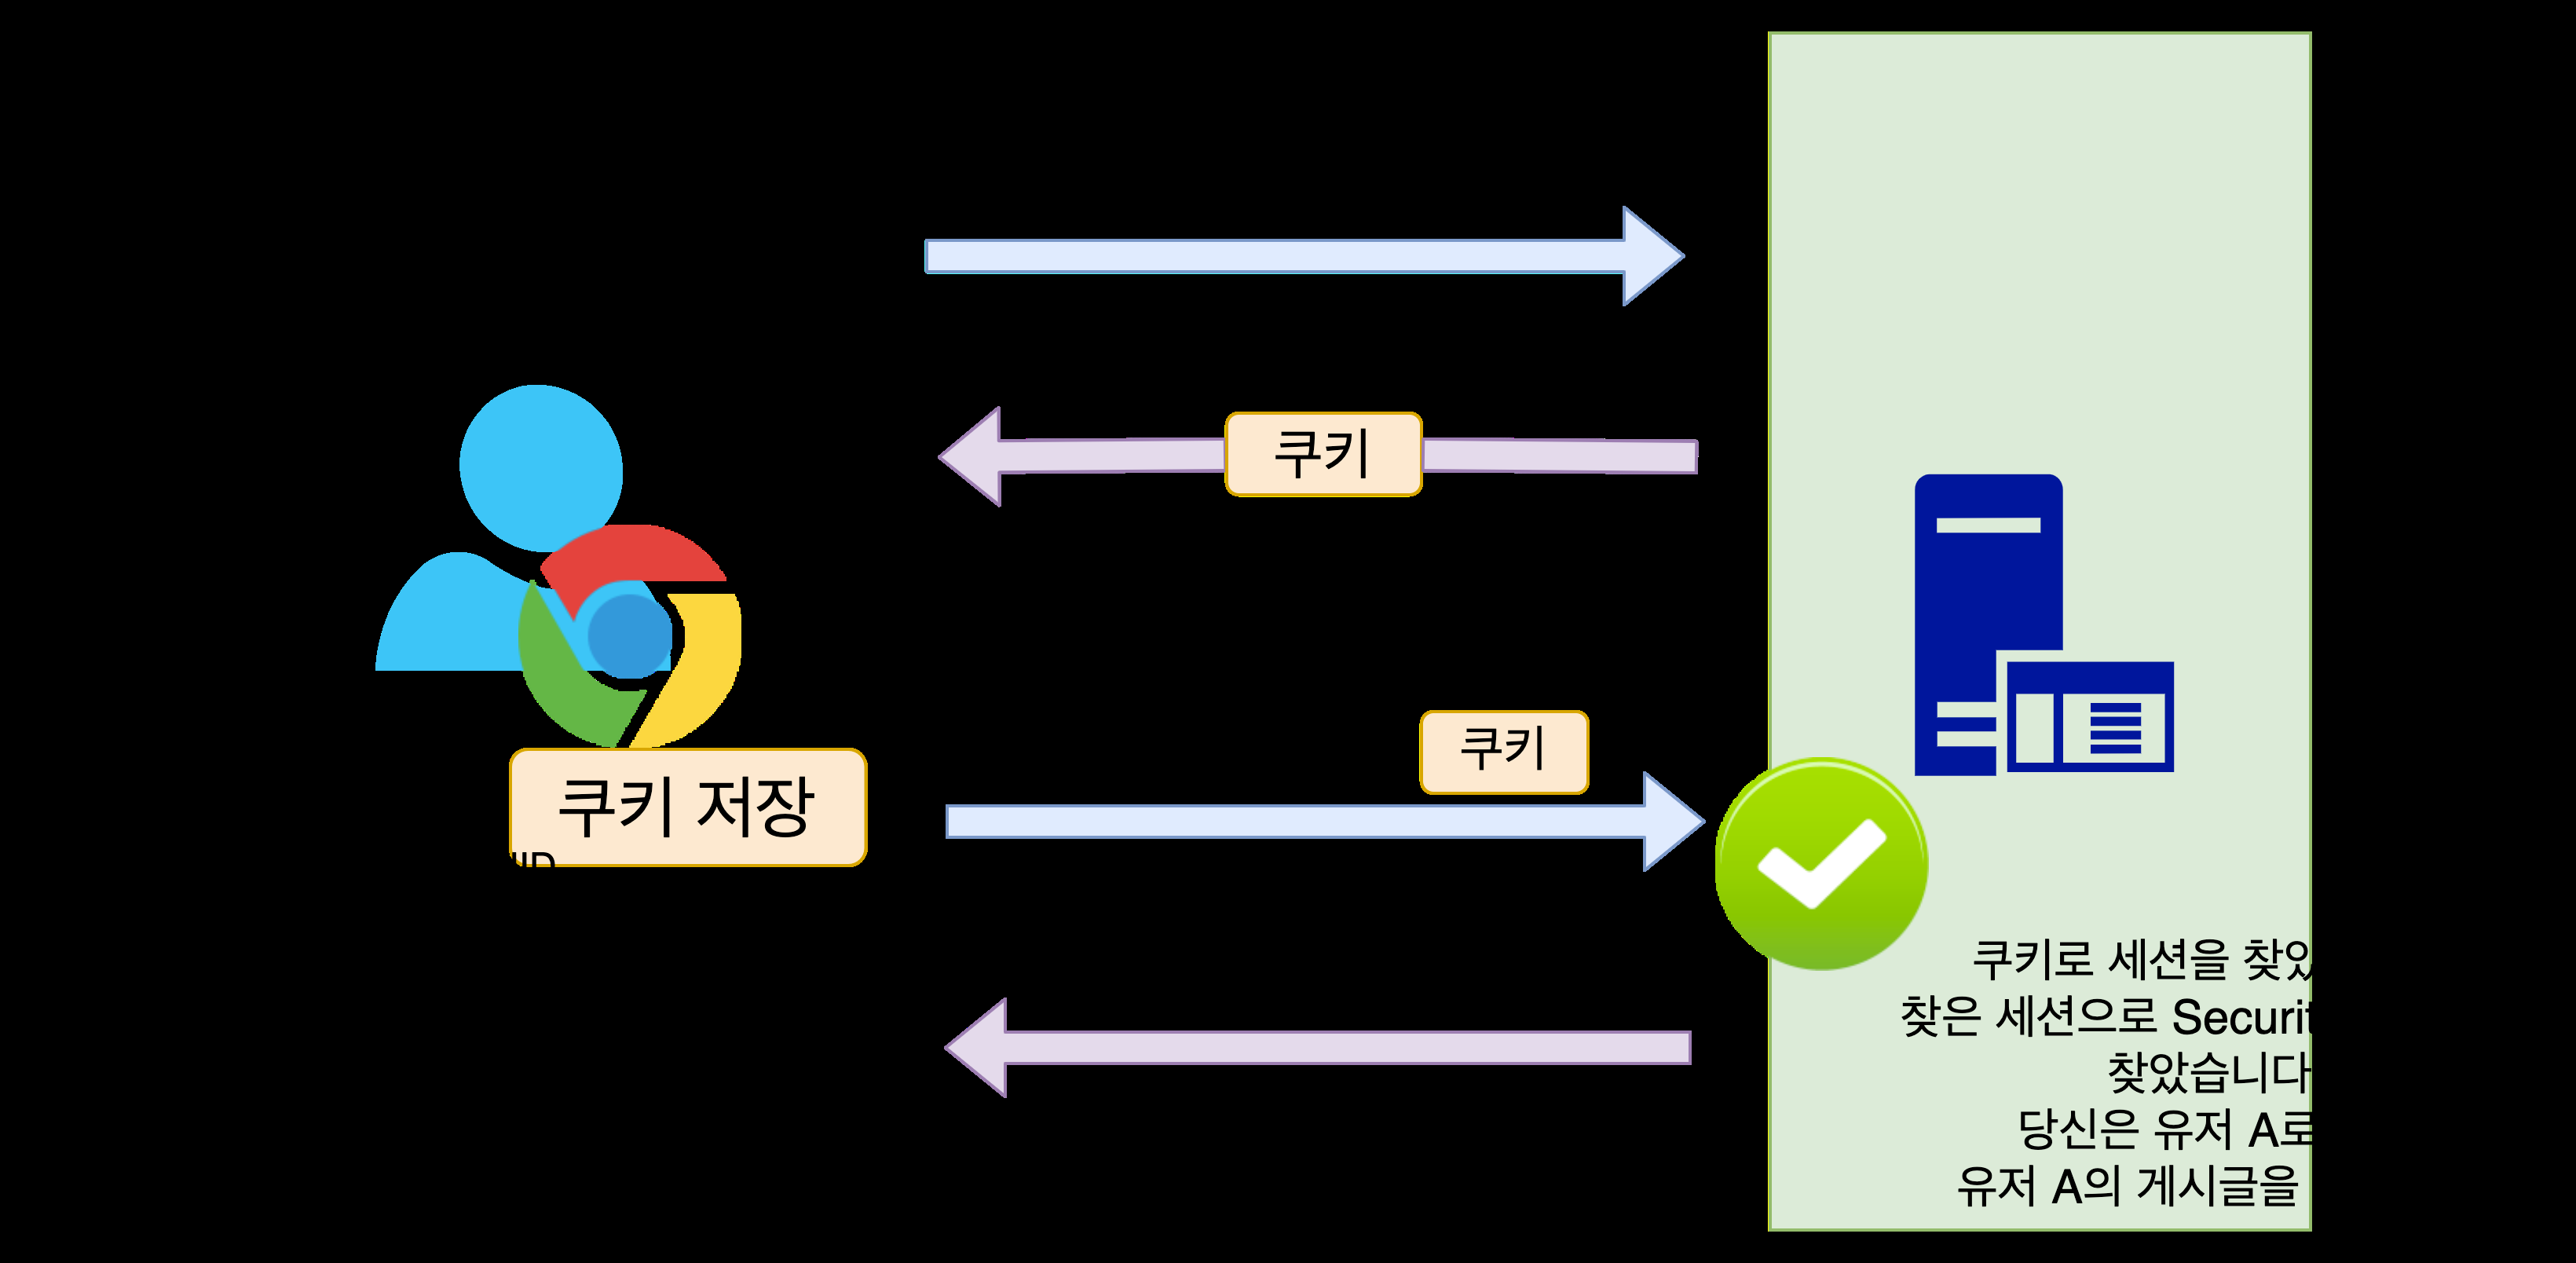
JSESSIONID
- 세션 유지에 필요한 Session ID를 쿠키로 가지고 있어야 한다
- 그 값은 JSESSIONID라는 KEY에 넣어서 가지고 있다
- 크롬 확장프로그램 EditThisCookie
BasicAuthenticationFilter
실습
- username 과 password를 추가해서 curl로 요청
- curl -u user:user -L http://localhost:8080/note
- 결과 : 로그인 페이지로 redirect, 로그인이 되지 않았다
- SpringSecurityConfig에 http.httpBasic(); 추가해서 BasicAuthenticationFilter를 활성화
@Override
protected void configure(HttpSecurity http)throws Exception{
        // basic authentication
        http.httpBasic();
        }
- 재시도
- curl -u user:user -L http://localhost:8080/note
- 정상적으로 페이지가 불러진다
- 따로 로그인이라는 과정를 하지 않았는데도 일회성으로 페이지를 불러올 수 있다
- 이처럼 로그인이라고 부르는 과정 없이도 username: user123 / password : pass123 라는 로그인 데이터를 Base64로 인코딩해서 모든 요청에 포함해서 보내면 BasicAuthenticationFilter는 이걸 인증한다
- 그렇기 때문에 세션이 필요 없고 요청이 올때마다 인증이 이루어진다 (즉 stateless 하다)
- 이런 방식은 요청할 때마다 아이디와 비밀번호가 반복해서 노출되기 때무에 보안에 취약하다
- 그렇기 때문에 BasicAuthenticationFilter를 사용할 때는 반드시 https를 사용하도록 권장된다
- BasicAuthenticationFilter를 사용하지 않을 것이라면 명시적으로 disable시켜주는 것이 좋다
@Override
protected void configure(HttpSecurity http)throws Exception{
        // basic authentication
        http.httpBasic(); // basic authentication filter 활성화
        http.httpBasic().disable(); // basic authentication filter 비활성화
        }
UsernamePasswordAuthenticationFilter
UsernamePasswordAuthenticationFilter는 Form 데이터로 username, password 기반의 인증을 담당하고 있는 필터이다.
- UsernamePasswordAuthenticationFilter: username, password 인증 필터
- ProviderManager(AuthenticationManager): 인증 정보 제공 관리자
- AbstractUserDetailsAuthenticationProvider: 인증 정보 제공 (계정의 상태나 패스워드 일치 여부 등을 파악)
- DaoAuthenticationProvider: 유저 정보 제공
- UserDetailsService: 유저 정보 제공하는 Service
- ProviderManager (AuthenticationManager)
- 인자로 받은 authentication이 유효한지 확인하고 authentication을 반환한다
- 인증하면서 계정에 문제가 있는 것이 발견되면 AuthenticationException를 throw할 수 있다.
- AuthenticationManager는 authenticate 하나만 구현하면 된다
- 이런 AuthenticationManager를 구현한 Class가 ProviderManager이다
- ProviderManager는 Password가 일치하는지, 계정이 활성화 되어있는지를 확인한 뒤 authentication을 반환한다
public interface AuthenticationManager {
    Authentication authenticate(Authentication authentication) throws AuthenticationException;
}
public class ProviderManager implements AuthenticationManager, MessageSourceAware, InitializingBean {
    @Override
    public Authentication authenticate(Authentication authentication) throws AuthenticationException {
        // 생략…
        result = provider.authenticate(authentication);
        // 생략…
    }
}
- DaoAuthenticationProvider (AbstractUserDetailsAuthenticationProvider)
- 유저를 인증하기 위해서는 어쨋든 먼저 유저정보를 가져와야 한다 DaoAuthenticationProvider는 유저 정보를 가져오는 Provider이다
- 구현한 UserDetailsService를 불러오는게 거의 전부이다
public abstract class AbstractUserDetailsAuthenticationProvider {
    public Authentication authenticate(Authentication authentication) throws AuthenticationException {
        String username = determineUsername(authentication);
        user = retrieveUser(username, (UsernamePasswordAuthenticationToken) authentication);
    }
}
public class DaoAuthenticationProvider extends AbstractUserDetailsAuthenticationProvider {
    protected final UserDetails retrieveUser(String username, UsernamePasswordAuthenticationToken authentication) {
        UserDetails loadedUser = this.getUserDetailsService().loadUserByUsername(username);
        return loadedUser;
    }
}
public UserDetailsService userDetailsService(){
        return username->{
        User user=userService.findByUsername(username);
        if(user==null){
        throw new UsernameNotFoundException(username);
        }
        return user;

        }
        }
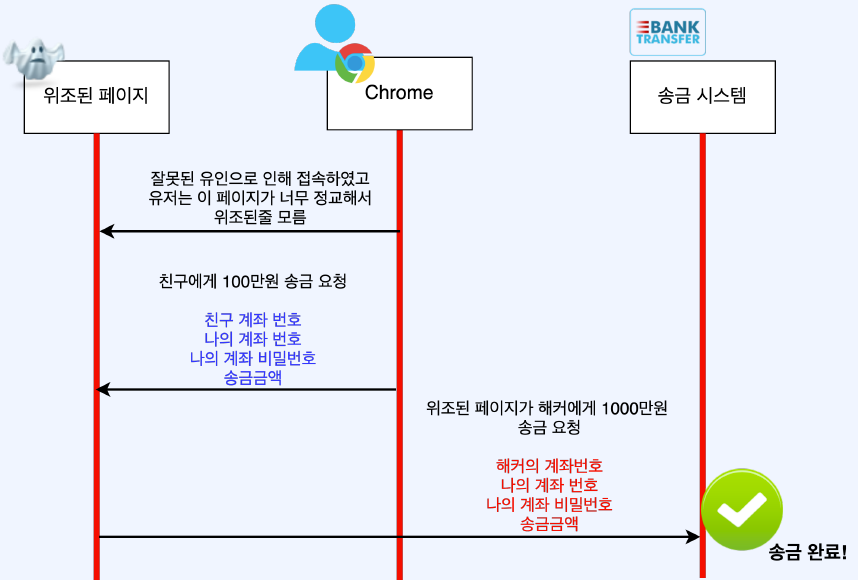
CsrfFilter
- CsrfFilter는 CsrfAttack를 방어하는 Filter 이다
- CsrfAttack이란?
- CsrfAttack을 막기 위해서
- CsrfFilter는 Csrf Token을 사용하여 위조된 페이지의 악의적인 공격을 방어한다
- 정상적인 페이지는 Csrf Token이 있을 것이고
- 위존된 페이지는 Csrf Token이 없거나 잘못된 Csrf Token을 가지고 있다
- 따라서 정상적인 페이지에는 Csrf Token 값을 알려줘야 하는데 Thymeleaf에서는 페이지를 만들때 자동으로 Csrf Token을 넣어준다
- 따로 추가하지 않았는데 아래 같은 코드가 form tag안에 자동으로 생성된다
<input type="hidden" name="_csrf" value="594af42a-63e9-4ef9-aeb2-3687f12cdf43"/>
- 대신 굳이 사용자에게 보여줄 필요가 없는 값이기 때문에 hidden으로 처리된다
- Csrf filter는 자동으로 활성화 되어있는 Filter지만 명시적으로 On 하기 위해서는 http.csrf(); 코드를 추가한다
- Off하기 위해서는 http.csrf().disable(); 코드를 추가한다

RememberMeAuthenticationFilter
- RememberMeAuthenticationFilter 는 일반적으로 세션보다 훨씬 오랫동안 로그인 사실을 기억할 수 있도록 해준다
- Session의 세션 만료 시간은 기본 설정이 30분이지만 RememberMeAuthentication의 기본 설정은 2주이다
- RememberMeAuthenticationFilter를 ON 하는 방법
// remember-me
http.rememberMe();
<div>
 <span>로그인 유지하기</span>
 <input type="checkbox" id="remember-me" name="remember-me" class="form-check-input mt-0" autocomplete="off">
</div>
AnonymousAuthenticationFilter
- 인증이 안된 유저가 유청을 하면 Anonymous(익명) 유저로 만들어 Authentication에 넣어주는 필터이다
- 인증되지 않았다고 하더라도 Null을 넣는게 아니라 기본 Authentication을 만들어 주는 개념으로 보면된다
- 다른 Filter에서 Anonymous 유저인지 정상적으로 인증된 유저인지 분기 처리를 할 수 있다
- AnonymousAuthenticationFilter 활성화
http.anonymous().principal("anonymousUser");
FilterSecurityInterceptor
- 이름만 봐서는 Interceptor로 끝나지만 Filter 중에 하나이다
- 앞서 본 SecurityContextPersistenceFilter, UsernamePasswordAuthenticationFilter, AnonymousAuthenticationFilter 에서 SecurityContext를 찾거나 만들어서 넘겨주고 있다는걸 확인했다
- FilterSecurityInterceptor에서는 이렇게 넘어온 authentication의 내용을 기반으로 최종 인가 판단을 내린다
- 그렇기 때문에 대부분의 경우에는 필터중에 뒤쪽에 위치한다
- 먼저, 인증(Authentication)을 가져오고 만약에 인증에 문제가 있다면 AuthenticationException를 발생한다
- 인증에 문제가 없다면 해당 인증으로 인가를 판단한다
- 이때 인가가 거절된다면 AccessDeniedException를 발생하고 승인된다면 정산적으로 필터가 종료된다
- FilterSecurityInterceptor.doFilter()
- AbstractSecurityInterceptor.beforeInvocation()
- AbstractSecurityInterceptor.authenticateIfRequired(): 인증에 문제가 있다면 AuthenticationException
- AbstractSecurityInterceptor.attemptAuthorization(): 인가에 문제가 있다면 AccessDeniedException
public class FilterSecurityInterceptor extends AbstractSecurityInterceptor implements Filter {
    public void doFilter(ServletRequest request, ServletResponse response, FilterChain chain)
            throws IOException, ServletException {
        invoke(new FilterInvocation(request, response, chain));
    }

    public void invoke(FilterInvocation filterInvocation) throws IOException, ServletException{
        InterceptorStatusToken token=super.beforeInvocation(filterInvocation);
    }

    protected InterceptorStatusToken beforeInvocation(Object object) {
        attemptAuthorization(object, attributes, authenticated);
    }

    private void attemptAuthorization(Object object, Collection<ConfigAttribute> attributes,
                                      Authentication authenticated) {
        try {
            this.accessDecisionManager.decide(authenticated, object, attributes);
        }
    }

    public void decide(Authentication authentication, Object object, Collection<ConfigAttribute> configAttributes)
            throws AccessDeniedException {
        int result = voter.vote(authentication, object, configAttributes);
    }

}
ExceptionTranslationFilter
- FilterSecurityInterceptor 에서 발생할 수 있는 두가지 Exception을 처리해주는 필터이다
- AuthenticationException : 인증에 실패할 때 발생
- AccessDeniedException : 인가에 실패할 때 발생
- 즉, 인증이나 인가에 실패 했을 때 어떤 행동을 취해야하는지를 결정해주는 Filter이다
- ExceptionTranslationFilter의 handleSpringSecurityException는 Exception의 종류에 따른 로직을 분산한다
private void handleSpringSecurityException(HttpServletRequest request, HttpServletResponse response,
FilterChain chain, RuntimeException exception) throws IOException, ServletException{
        if(exception instanceof AuthenticationException){
        handleAuthenticationException(request,response,chain,(AuthenticationException)exception);
        }
        else if(exception instanceof AccessDeniedException){
        handleAccessDeniedException(request,response,chain,(AccessDeniedException)exception);
        }
        }
- 기본설정
- AuthenticationException 발생 또는 Anonymous의 AccessDeniedException 발생 : Login Page로 이동
- 기명 유저의 AccessDeniedException 발생 : 403 Forbidden Whitelabel Error Page로 이동
Spring Security 적용하기
Spring Security Config 설정하기
- 필터 Off
- Spring Security 의 특정 필터를 disable하여 동작하지 않게 한다
- 사용하지 않을 필터를 명시적으로 disable하는 것도 좋은 방법이다
http.httpBasic().disable();
- 로그인 & 로그아웃 페이지 관련 기능
- 폼 로그인의 로그인 페이지를 지정하고 로그인에 성공했을때 이동하는 URL을 지정한다
- 로그아웃 URL을 지정하고 로그아웃에 성공했을때 이동하는 URL을 지정한다
// login
http.formLogin()
 .loginPage("/login")
 .defaultSuccessUrl("/")
 .permitAll(); // 모두 허용


// logout
http.logout()
.logoutRequestMatcher(new AntPathRequestMatcher("/logout"))
.logoutSuccessUrl("/");
URL Matchers 관련 기능
- antMatchers
- “/signup” 요청을 모두에게 허용한다
http.authorizeRequests()
 .antMatchers("/signup").permitAll()
- mvcMatchers
- “/signup”, “/signup/“, “/signup.html” 와 같은 유사 signup 요청을 모두에게 허용한다
http.authorizeRequests()
 .mvcMatchers("/signup").permitAll()
- regexMatchers
- 정규식 표현식으로 매칭
- requestMatchers
- antMatchers, mvcMatchers, regexMatchers는 결국에 requestMatchers로 이루어져있다
- 명확하게 요청 대상을 지정하는 경우에는 requestMatchers를 사용한다
PathRequest.toStaticResources().atCommonLocations(
인가 관련 설정
- authorizeRequests()
- 인가를 설정한다
http.authorizeRequests()
- permitAll()
- “/home” 요청을 모두에게 허용한다
http.authorizeRequests()
 .antMatchers("/home").permitAll(
- hasRole()
- 권한을 검증한다
http.authorizeRequests()
 .antMatchers(HttpMethod.POST, "/notice").hasRole("ADMIN")
- authenticated()
- 인증이 되었는지를 검증한다
http.authorizeRequests()
 .anyRequest().authenticated()
- Ignoring
- 특정 리소스에 대해서 Spring Security자체를 적용하지 않고 싶을 때가 있다
- ignoring을 사용한 코드는 permitAll을 사용한 코드와 다르게 아예 Spring Security의 대상에 포함되지 않는다
- 즉, 어떤 필터도 실행되지 않기 때문에 ignoring이 성능적으로 우수하다
@Override
 public void configure(WebSecurity web) {
 // 정적 리소스 spring security 대상에서 제외
// web.ignoring().antMatchers("/images/**", "/css/**"); // 아래 코드와 같은 코드입니다.
 web.ignoring().requestMatchers(PathRequest.toStaticResources().atCommonLocations());
 }
http.authorizeRequests()
 .requestMatchers(PathRequest.toStaticResources().atCommonLocations()).permitAll()
스프링 시큐리티 테스트
- Spring Security를 사용하는 프로젝트의 테스트는 Spring Security가 없는 프로젝트 테스트와 조금 다른 부분이 있다
- Spring Security의 테스트에서는 User가 로그인한 상태를 가정하고 테스트해야하는 경우가 많다
- 인증을 받지 않은 상태로 테스트를 하면 Spring Security에서 요청 자체를 막기 때문에 테스트가 제대로 동작조차 하지 못한다
- 이런 문제는 프로젝트에 spring-security-test를 사용해서 해결할 수 있다
- spring-security-test를 사용하면 테스트 직전에 Mock User를 인증시켜놓고 테스트를 구동시킬수 있다
- SpringSecurityTest 의존성 추가
- testImplementation ‘org.springframework.security:spring-security-test’
- Test 실행 전 MockMvc에 springSecurity (static 메소드)를 설정한다
@BeforeEach
public void setUp(@Autowired WebApplicationContext applicationContext) {
        this.mockMvc = MockMvcBuilders.webAppContextSetup(applicationContext)
        .apply(springSecurity())
        .build();
        }
@WithMockUser
- Mock(가짜) User를 생성하고 Authentication을 만든다
- 여기서 User은 org.springframework.security.core.userdetails.User를 말한다
| 멤버변수 | 예시 | 설명 |
|---|---|---|
| roles | USER | 권한 (ROLE_ 자동으로 붙음) |
| authorities | ROLE_USER | 권한 (사용하면 roles를 무시함) |
| username | user123 | 유저명 |
| password | password123 | 패스워드 |
| setupBefore | TestExecutionEvent.TEST_METHOD, TestExecutionEvent.TEST_EXECUTION | 언제 유저가 세팅되는지 정함 |
- 내부에서 UserDetails를 직접 구현해서 Custom User를 만들어 사용하는 경우에는 WithMockUser를 사용하면 문제가 발생할 수 있다
- WithMockUser는 org.springframework.security.core.userdetails.User를 만들어 주지만 우리가 필요한 User는 Custom User이기 때문이다 (class cast 에러가 발생할 수 있다)
@WithUserDetails
- WithMockUser와 마찬가지로 Mock(가짜) User를 생성하고 Authentication을 만든다
- WithMockUser와 다른점은 가짜 User를 가져올 때 UserDetailsService의 Bean 이름을 넣어줘서 userDetailsService.loadUserByUsername(String username)을 통해 User를 가져온다
| 멤버변수 | 예시 | 설명 |
|---|---|---|
| value | user123 | 가져올 user의 username |
| userDetailsServiceBeanName | userDetailsService | UserDetailsService를 구현한 Bean의 이름 |
| setupBefore | TestExecutionEvent.TEST_EXECUTION | 언제 유저가 세팅되는지 정함 |
@WithAnonymousUser
- WithMockUser와 동일하지만 인증된 유저 대신에 익명(Anonymous)유저를 Authentication에서 사용한다
- 익명이기 때문에 멤버변수에 유저 관련된 값이 없다
| 멤버변수 | 예시 | 설명 |
|---|---|---|
| setupBefore | TestExecutionEvent.TEST_EXECUTION | 언제 유저가 세팅되는지 정함 |
@WithSecurityContext
- 다른 방식들은 Authentication을 가짜로 만들었다고 한다면 WithSecurityContext는 아예 SecurityContext를 만든다
| 멤버변수 | 설명 |
|---|---|
| factory | WithSecurityContextFactory를 Implement한 Class를 넣어준다 |
| setupBefore | 언제 유저가 세팅되는지 정함 |
- WithSecurityContextFactory를 Implement한 Class
public interface WithSecurityContextFactory<A extends Annotation> {
SecurityContext createSecurityContext(A annotation);
}
with(user( ))
- 다른 방식은 어노테이션 기반인 반면에 이 방식은 직접 User를 MockMvc에 주입하는 방법이다
- WithMockUser와 마찬가지로 유저를 생성해서 Principal에 넣고 Authentication을 생성한다
- org.springframework.security.test.web.servlet.request.user를 사용
mockMvc.perform(get("/admin")
 .with(user(user))) // 유저 추가
Custom Filter 만들기
- 프로젝트에 SpringSecurity를 포함시켜 개발하다 보면 SpringScurity에서 기본으로 제공하는 필터뿐만 아니라 개발자가 원하는 방식대로 동작하는 필터가 필요할때가 많다
- 이럴때 커스텀 필터를 구현하면 된다
- 커스텀 필터를 구현하기 위해서는 다른 필터와 마찬가지로 Filter Interface를 구현해야 한다
- 그러나 Filter Interface를 직접 구현하게 되면 중복실행 문제가 있다
- 대부분의 경우에는 OncePerRequestFilter를 구현하기를 권장한다
- 예시 1)
- 1개의 요청이 들어온 시점부터 끝날 때 까지 걸린 시간을 Log로 기록한다
- Stopwatch로 시작을 기록하고 모든 필터체인과 요청이 끝난뒤에 작업한 시간을 기록한다
- EX) StopWatch ‘/login’: running time = 150545041 ns
@Slf4j
public class StopwatchFilter extends OncePerRequestFilter {
 protected void doFilterInternal(
 HttpServletRequest request,
 HttpServletResponse response,
 FilterChain filterChain
 ) throws ServletException, IOException {
 StopWatch stopWatch = new StopWatch(request.getServletPath());
 stopWatch.start(); // stop watch 시작
 filterChain.doFilter(request, response);
 stopWatch.stop(); // stop watch 종료
 log.info(stopWatch.shortSummary());
 }
}
- 예시 2)
- 개인보안노트서비스는 1명의 유저는 1개의 권한을 갖도록 되어있다
- 권한이 나눠져있다보니 테스트하는데 어려움을 느꼈다
- 그래서 tester 유저인 경우에는 모든 권한을 한번에 갖은 필터를 만들었다
public class TesterAuthenticationFilter extends UsernamePasswordAuthenticationFilter {
 public Authentication attemptAuthentication(HttpServletRequest request, HttpServletResponse response) {
     Authentication authentication = super.attemptAuthentication(request, response);
     User user = (User) authentication.getPrincipal();
     if (user.getUsername().startsWith("tester")) {
         return new UsernamePasswordAuthenticationToken(
                 user,
                 null,
                 Stream.of("ROLE_ADMIN", "ROLE_USER")
                         .map(authority -> (GrantedAuthority) () -> authority)
                         .collect(Collectors.toList())
         );
     }
     return authentication;
 }
- 필터가 구현이 되었다면 필터를 추가해야한다
- 필터를 추가하는 작업은 SpringSecurityConfig(WebSecurityConfigurerAdapter)에서 할수 있다
- 이때 순서를 정해야 하는데 이미등록된 필터를 하나 정하고 그 앞에 위치할 것인지 뒤에 위치할 것인지 정하면된다
- http.addFilterBefore(새로운필터, 이미존재하고앞에있는필터)
- http.addFilterAfter(새로운필터, 이미존재하고뒤에있는필터)
// stopwath filter
http.addFilterBefore(
 new StopwatchFilter(),
 WebAsyncManagerIntegrationFilter.class
);
http.addFilterBefore(
 new TesterAuthenticationFilter(this.authenticationManager()),
 UsernamePasswordAuthenticationFilter.class
);
JWT 기본개념
토큰으로 인증하기
- 세션은 이런 장단점을 자기고 있다.
- 장점
- JSESSIONID는 유의미한 값이 아니라 서버에서 세션(사용자) 정보를 찾는 Key로만 활용한다
- 따라서 탈취되었다고 해서 개인정보가 탈취된건 아니다
- 세션하이제킹 공격을 당할수 있기 때문에 절대적으로 안전하다는 뜻은 아니다
- 단점
- 서버에 세션(사용자) 정보를 저장할 공간이 필요하다
- 서비스를 이용하는 사용자가 많다면 저장할 공간도 더 많이 필요하다
- 분산 서버에서는 세션을 공유하는데 어려움이 있다
- 장점
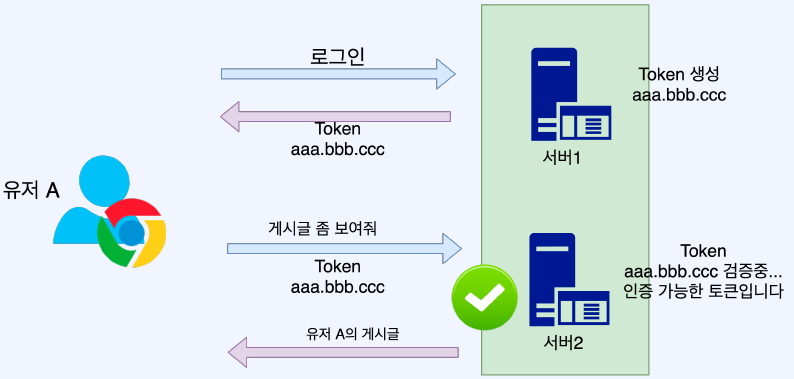
- 세션의 단점을 해결하기 위해서 토큰으로 인증하는 방법을 사용할 수 있다
- 유저가 로그인을 하면 서버에서는 토큰을 생성한 뒤에 저장하지 않고 (stateless) 토큰 값을 내려준다
- 이 토큰 값을 유저가 게시글 조회 요청을 할 때 함께 보내고 서버2(서버1 이여도 상관없다)에서 이 토큰을 의미 있는 값으로 해석한다 그리고 그 값을 토대로 유저를 인증한다
- 세션방식에서의 JSESSIONID은 key로만 활용될 수 있는 의미없는 값 들이 들어있다
- 그러나 토큰은 유저를 설명할 수 있는 데이터(ex username)포함한다
- 토큰 방식은 다음과 같은 장단점이 있다.
- 장점
- 세션관리를 할필요가 없어 별도의 저장소가 필요하지 않다
- 서버 분산&클러스터 환경과 같은 확장성에 좋다
- 단점
- 한 번 제공된 토큰은 회수가 어렵다
- 세션의 경우에는 서버에서 세션을 삭제해버리면 브라우저의 JSESSIONID는 무용지물이 되어버린다
- 그러나 토큰은 세션을 저장하지 않기 때문에 한번 제공된 토큰을 회수할수 없다
- 그래서 보통 토큰의 유효기간을 짧게 한다
- 토큰에는 유저의 정보가 있기 때문에 상대적으로 안정성이 우려된다 따라서 민감정보를 토큰에 포함시키면 안된다 (ex 패스워드, 개인정보)
- 장점
JWT의 구조
- 토큰 방식에서 가장 잘 알려진 JWT가 있다
- Json Web Token의 줄임말이다
- JWT구조는 아래와 같다
- HEADER.PAYLOAD.SIGNATURE
- 예시
- eyJhbGciOiJIUzUxMiJ9.eyJzdWIiOiJ1c2VyIiwicm9sZXMiOl.hHkvviDzMIx8EkXUTZsNLWGy51p2 bVnJknEC0HYxMaRkXGQJdIWqIX1Rv8rGK6bMq6mYyGES3jxNJVPz33wvEQ
- Header
- Header는 JWT를 검증하는데 필요한 정보를 가진 객체이다
- Signature에 사용한 암호화 알고리즘이 무엇인지, Key의 ID가 무었인지 정보를 담고 있다
- 이 정보를 Json으로 변환해서 UTF-8로 인코딩한 뒤 Base64 URL-Safe로 인코딩한 값이 들어가 있다
- 결과 값이 난해한 문자로 보이지만 암호화된 값은 아니다

- Payload
- 실질적으로 인증에 필요한 데이터를 저장한다
- 데이터의 각각 필드들을 Claim이라고 한다
- 대부부의 경우에 Claim에 username을 포함한다
- 인증할 때 payload에 있는 username을 가져와서 유저 정보를 조회할 때 사용해야하기 때문이다
- 또한, 토큰 발행시간(iat)와 토큰 만로시간(exp)를 포함한다
- 그외에도 원하는 Claim을 얼마든지 추가할수 있지만 민감정보는 포함시켜서는 안된다
- Payload 역시 Header와 마찬가지로 암호화되지 않는다
- Json으로 바꾼뒤 UTF8로 인코딩하고 Base64로 변겨한 데이터일 뿐이다

- Signature
- 앞선 Header와 Payload는 암호화하지 않았고 json -> utf8 ->base64로 변환한 데이터이다
- 이렇게 Header와 Payload 생성 매커니즘은 너무 쉽고 누구나 만들 수 있는 데이터이다
- 따라서 저 두개의 데이터만 있다면 토큰에 대한 진위여부 판단은 전혀 이루어질수 없다
- 그래서 JWT의 구조에서 가장 마지막에 있는 Signature는 토큰 자체의 진위여부를 판단하는 용도로 사용한다
- Signature는 Header와 Payload를 합친뒤 비밀키로 Hash를 생성하여 암호화 한다
- 헤더.페이로드 값을 SecretKey로 Hashing하고 Base64로 변경한다

- Key Rolling
- JWT의 토큰 생성 매커니즘을 보다보면 Secret Key가 노출되면 사실상 모든 데이터가 유출될 수 있다는 걸 알수 있다
- 이런 문제를 방지하기 위해 Secret Key를 여러개 두고 Key 노출을 대비할 수 있다
- Secret Key를 여러개를 사용하고 수시로 추가하고 삭제해줘서 변경한다면 Secret Key 중에 1개가 노출되어도 다른 Secret Key와 데이터는 안전한 상태가 된다
- 이걸 바로 Key Rolling이라고 한다 (Key Rolling은 필수가 아니다)
- Key Rolling에서는 여러개의 Secret Key가 존재한다
- Secret Key 1개에 Unique한 ID (kid 혹은 key id라고 부른다)를 연결시켜 둔다
- JWT 토큰을 만들 때 헤더에 kid를 포함하여 제공하고 서버에서 토큰을 해석할 때 kid로 Secret Key를 찾아서 Signature를 검증한다
Spring Security + JWT 구현하기
JWT Util 만들기
- 의존성 추가
// jjwt
implementation 'io.jsonwebtoken:jjwt-api:0.11.2'
runtimeOnly 'io.jsonwebtoken:jjwt-impl:0.11.2'
runtimeOnly 'io.jsonwebtoken:jjwt-jackson:0.11.2'
- JwtKey
- JWT Secret Key 를 관리하고 제공한다
- Key Rolling을 지원한다
- JwtUtils
- JWT 토큰을 생성하거나 Parsing하는 메소드를 제공한다
- SigningKeyResolver
- JWT의 헤더에서 kid를 찾아서 Key(SecretKey + 알고리즘)를 찾아온다
- Signature를 검증할 때 사용한다
- JwtKey.getKey()
- kid로 Secret Key를 찾아온다
/**
 * kid로 Key찾기
*
 * @param kid kid
 * @return Key
 */
public static Key getKey(String kid){
        String key=SECRET_KEY_SET.getOrDefault(kid,null);
        if(key==null)
        return null;
        return Keys.hmacShaKeyFor(key.getBytes(StandardCharsets.UTF_8));
        }
- JwtKey.getRandomKey()
- 여러개의 Secret Key 중에 랜덤으로 선택하여 kid와 SecretKey를 제공한다
/**
 * SECRET_KEY_SET 에서 랜덤한 KEY 가져오기
*
 * @return kid와 key Pair
 */
public static Pair<String, String> getRandomKey() {
 String kid = KID_SET[randomIndex.nextInt(KID_SET.length)];
 return Pair.of(kid, SECRET_KEY_SET.get(kid));
}
- JwtUtils.createToken()
- User로 JWT Token을 만든다
- HEADER: alg(알고리즘 종류), kid
- PAYLOAD: sub(username), iat(토큰발행시간), exp(토큰만료시간)
- SIGNATURE: JwtKey.getRandomKey로 구한 Secret Key로 HS512 해시
public static String createToken(User user){
        Claims claims=Jwts.claims().setSubject(user.getUsername());// subject
        Date now=new Date(); // 현재 시간
        Pair<String, String> key=JwtKey.getRandomKey();
        // JWT Token 생성
        return Jwts.builder()
        .setClaims(claims) // 정보 저장
        .setIssuedAt(now) // 토큰 발행 시간 정보
        .setHeaderParam(JwsHeader.KEY_ID,key.getFirst()) // kid
        .setExpiration(new Date(now.getTime()+JwtProperties.EXPIRATION_TIME)) // 토큰 만료 시간 설정 (now + 10분)
        .signWith(Keys.hmacShaKeyFor(key.getSecond().getBytes(StandardCharsets.UTF_8))) // 알고리즘과 SecretKey
        .compact();
        }
- JwtUtils.getUsername()
- JWT Token에서 username을 구한다
- SigningKeyResolver로 Signature를 검증한다
- 이 과정중에 토큰이 만료가 되었거나 적합하지 않으면 Exception이 발생한다
/**
 * 토큰에서 username 찾기
 * @param token 토큰
 * @return username
 */
public static String getUsername(String token) {
 return Jwts.parserBuilder() // parser용 builder
 .setSigningKeyResolver(SigningKeyResolver.instance)
 .build()
 .parseClaimsJws(token)
 .getBody()
 .getSubject();
}
- SigningKeyResolver
- SigningKeyResolver는 헤더에 있는 kid를 조회해서 그 kid에 해당하는 비밀키를 가져온다
/**
 * JwsHeader를 통해 Signature 복호화에 필요한 Key를 조회해옵니다.
 */
public class SigningKeyResolver extends SigningKeyResolverAdapter {
 public static SigningKeyResolver instance = new SigningKeyResolver();
 @Override
 public Key resolveSigningKey(JwsHeader jwsHeader, Claims claims) {
 String kid = jwsHeader.getKeyId();
 if (kid == null)
 return null;
 return JwtKey.getKey(kid);
 }
}
JWT Filter 만들기
- JwtAuthenticationFilter
- 로그인을 하면 JWT 토큰을 응답 쿠키에 넣어준다
- UsernamePasswordAuthenticationFilter를 상속했기 때문에 기본동작은 거의 비슷하다
- 로그인에 성공하면 User 정보로 JWT Token을 생성하고 응답 쿠키에 값을 넣어준다
@Override
protected void successfulAuthentication(
 HttpServletRequest request,
 HttpServletResponse response,
 FilterChain chain,
 Authentication authResult
) throws IOException {
 User user = (User) authResult.getPrincipal();
 String token = JwtUtils.createToken(user);
 // 쿠키 생성
 Cookie cookie = new Cookie(JwtProperties.COOKIE_NAME, token);
 cookie.setMaxAge(JwtProperties.EXPIRATION_TIME); // 쿠키의 만료시간 설정
 cookie.setPath("/");
 response.addCookie(cookie);
 response.sendRedirect("/");
- JwtAuthorizationFilter
- Cookie에서 JWT Token을 구한다
- JWT Token을 파싱하여 username을 구한다
- username으로 User을 구하고 Authentication을 생성한다
- 생성된 Authentication을 SecurityContext에 넣는다
- Exception이 발생하면 응답의 쿠키를 null로 변경한다
- SpringSecurityConfig
// basic authentication
http.httpBasic().disable(); // basic authentication filter 비활성화
// csrf
http.csrf().disable();
// remember-me
http.rememberMe().disable();
// stateless
http.sessionManagement()
 .sessionCreationPolicy(SessionCreationPolicy.STATELESS);
// jwt filter
http.addFilterBefore(
 new JwtAuthenticationFilter(authenticationManager()),
 UsernamePasswordAuthenticationFilter.class
).addFilterBefore(
 new JwtAuthorizationFilter(userRepository),
 BasicAuthenticationFilter.class
);