코딩으로 학습하는 GoF의 디자인 패턴
행동 관련 패턴(Behavioral Patterns)
카테고리 : 코딩으로 학습하는 GoF의 디자인 패턴
행동 관련 패턴(Behavioral Patterns)
- 행동 관련 패턴(Behavioral Patterns)
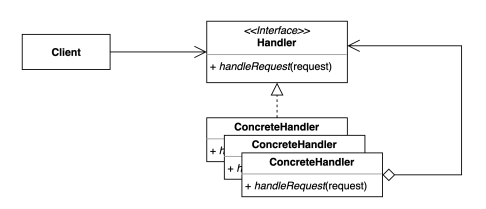
책임 연쇄 패턴 (Chain-of-Responsibility) 패턴
요청을 보내는 쪽(sender)과 요청을 처리하는 쪽(receiver)의 분리하는 패턴
- 핸들러 체인을 사용해서 요청을 처리한다.
- 단일 책임 원칙에서의 책임
책임 연쇄 패턴 (Chain-of-Responsibility) 패턴 구현 방법
기존
- Request.class
public class Request {

    private String body;

    public Request(String body) {
        this.body = body;
    }

    public String getBody() {
        return body;
    }

    public void setBody(String body) {
        this.body = body;
    }
}
- RequestHandler.class
public class RequestHandler {

    public void handler(Request request) {
        System.out.println(request.getBody());
    }
}
- AuthRequestHandler.class
public class AuthRequestHandler extends RequestHandler {

    public void handler(Request request) {
        System.out.println("인증이 되었나?");
        System.out.println("이 핸들러를 사용할 수 있는 유저인가?");
        super.handler(request);
    }
}
- LoggingRequestHandler.class
public class LoggingRequestHandler extends RequestHandler {

    @Override
    public void handler(Request request) {
        System.out.println("로깅");
        super.handler(request);
    }
}
- Client.class
public class Client {

    public static void main(String[] args) {
        Request request = new Request("무궁화 꽃이 피었습니다.");
        RequestHandler requestHandler = new LoggingRequestHandler();
        requestHandler.handler(request);
    }
}
변경
- RequestHandler.class
public abstract class RequestHandler {

    private RequestHandler nextHandler;

    public RequestHandler(RequestHandler nextHandler) {
        this.nextHandler = nextHandler;
    }

    public void handle(Request request) {
        if (nextHandler != null) {
            nextHandler.handle(request);
        }
    }
}
- PrintRequestHandler.class
public class PrintRequestHandler extends RequestHandler {

    public PrintRequestHandler(RequestHandler nextHandler) {
        super(nextHandler);
    }

    @Override
    public void handle(Request request) {
        System.out.println(request.getBody());
        super.handle(request);
    }
}
- LoggingRequestHandler.class
public class LoggingRequestHandler extends RequestHandler {

    public LoggingRequestHandler(RequestHandler nextHandler) {
        super(nextHandler);
    }

    @Override
    public void handle(Request request) {
        System.out.println("로깅");
        super.handle(request);
    }
}
- AuthRequestHandler.class
public class AuthRequestHandler extends RequestHandler {

    public AuthRequestHandler(RequestHandler nextHandler) {
        super(nextHandler);
    }

    @Override
    public void handle(Request request) {
        System.out.println("인증이 되었는가?");
        super.handle(request);
    }
}
- Client.class
public class Client {

    private RequestHandler requestHandler;

    public Client(RequestHandler requestHandler) {
        this.requestHandler = requestHandler;
    }

    public void doWork() {
        Request request = new Request("이번 놀이는 뽑기입니다.");
        requestHandler.handle(request);
    }

    public static void main(String[] args) {
        RequestHandler chain = new AuthRequestHandler(new LoggingRequestHandler(new PrintRequestHandler(null)));
        Client client = new Client(chain);
        client.doWork();
    }
}
책임 연쇄 패턴 (Chain-of-Responsibility) 패턴 구현 복습
- 장점
- 클라이언트 코드를 변경하지 않고 새로운 핸들러를 체인에 추가할 수 있다.
- 각각의 체인은 자신이 해야하는 일만 한다.
- 체인을 다양한 방법으로 구성할 수 있다.
- 단점
- 디버깅이 조금 어렵다.
실무에서 어떻게 쓰이나?
- 자바
- 서블릿 필터
public class CoRInJava {

    public static void main(String[] args) {
        Filter filter = new Filter() {
            @Override
            public void doFilter(ServletRequest request, ServletResponse response, FilterChain chain) throws IOException, ServletException {
                // TODO 전처리
                chain.doFilter(request, response);
                // TODO 후처리
            }
        };
    }
}
@WebFilter(urlPatterns = "/hello")
public class MyFilter implements Filter {

    @Override
    public void doFilter(ServletRequest request, ServletResponse response, FilterChain chain) throws IOException, ServletException {
        System.out.println("게임에 참하신 여러분 모두 진심으로 환영합니다.");
        chain.doFilter(request, response);
        System.out.println("꽝!");
    }
}
@ServletComponentScan
@SpringBootApplication
public class App {

    public static void main(String[] args) {
        SpringApplication.run(App.class, args);
    }
}
@RestController
public class HelloController {

    @GetMapping("/hello")
    public String hello() {
        return "hello";
    }
}
- 스프링
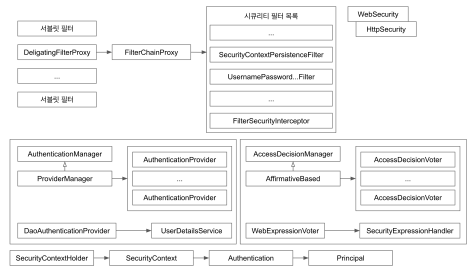
- 스프링 시큐리티 필터
@Configuration
public class SecurityConfig extends WebSecurityConfigurerAdapter {

    @Override
    protected void configure(HttpSecurity http) throws Exception {
        http.authorizeRequests().anyRequest().permitAll().and();
    }

}
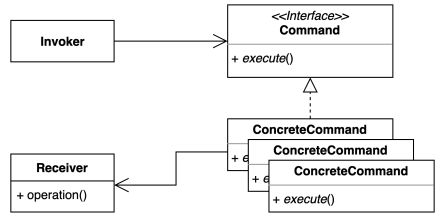
커맨드 (Command) 패턴
요청을 캡슐화 하여 호출자(invoker)와 수신자(receiver)를 분리하는 패턴.
- 요청을 처리하는 방법이 바뀌더라도, 호출자의 코드는 변경되지 않는다.
커맨드 (Command) 패턴 구현 방법
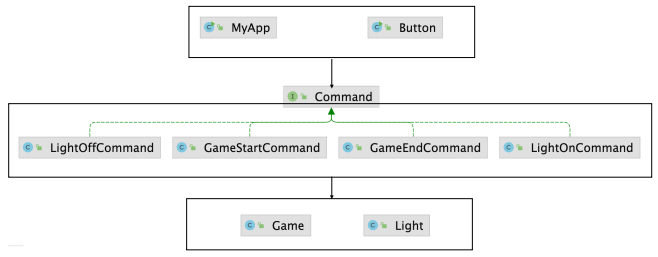
기존
- Light.class
public class Light {

    private boolean isOn;

    public void on() {
        System.out.println("불을 켭니다.");
        this.isOn = true;
    }

    public void off() {
        System.out.println("불을 끕니다.");
        this.isOn = false;
    }

    public boolean isOn() {
        return this.isOn;
    }
}
- Game.class
public class Game {

    private boolean isStarted;

    public void start() {
        System.out.println("게임을 시작합니다.");
        this.isStarted = true;
    }

    public void end() {
        System.out.println("게임을 종료합니다.");
        this.isStarted = false;
    }

    public boolean isStarted() {
        return isStarted;
    }
}
- Button.class
public class Button {

    private Light light;

    public Button(Light light) {
        this.light = light;
    }

    public void press() {
        light.off();
    }

    public static void main(String[] args) {
        Button button = new Button(new Light());
        button.press();
        button.press();
        button.press();
        button.press();
    }
}
- MyApp.class
public class MyApp {

    private Game game;

    public MyApp(Game game) {
        this.game = game;
    }

    public void press() {
        game.start();
    }

    public static void main(String[] args) {
        Button button = new Button(new Light());
        button.press();
        button.press();
        button.press();
        button.press();
    }
}
변경
- Command.class
public interface Command {

    void execute();

    void undo();

}
- GameEndCommand.class
public class GameEndCommand implements Command {

    private Game game;

    public GameEndCommand(Game game) {
        this.game = game;
    }

    @Override
    public void execute() {
        game.end();
    }

    @Override
    public void undo() {
        new GameStartCommand(this.game).execute();
    }
}
- GameStartCommand.class
public class GameStartCommand implements Command {

    private Game game;

    public GameStartCommand(Game game) {
        this.game = game;
    }

    @Override
    public void execute() {
        game.start();
    }

    @Override
    public void undo() {
        new GameEndCommand(this.game).execute();
    }
}
- LightOffCommand.class
public class LightOffCommand implements Command {

    private Light light;

    public LightOffCommand(Light light) {
        this.light = light;
    }

    @Override
    public void execute() {
        light.off();
    }

    @Override
    public void undo() {
        new LightOnCommand(this.light).execute();
    }
}
- LightOnCommand.class
public class LightOnCommand implements Command {

    private Light light;

    public LightOnCommand(Light light) {
        this.light = light;
    }

    @Override
    public void execute() {
        light.on();
    }

    @Override
    public void undo() {
        new LightOffCommand(this.light).execute();
    }
}
- Button.class
public class Button {

    private Stack<Command> commands = new Stack<>();

    public void press(Command command) {
        command.execute();
        commands.push(command);
    }

    public void undo() {
        if (!commands.isEmpty()) {
            Command command = commands.pop();
            command.undo();
        }
    }

    public static void main(String[] args) {
        Button button = new Button();
        button.press(new GameStartCommand(new Game()));
        button.press(new LightOnCommand(new Light()));
        button.undo();
        button.undo();
    }

}
- MyApp.class
public class MyApp {

    private Command command;

    public MyApp(Command command) {
        this.command = command;
    }

    public void press() {
        command.execute();
    }

    public static void main(String[] args) {
        MyApp myApp = new MyApp(new GameStartCommand(new Game()));
    }
}
커맨드 (Command) 패턴 구현 복습
- 장점
- 기존의 코드를 변경하지 않고 새로운 커맨드를 만들 수 있다.
- 수신자의 코드가 변경되어도 호출자의 코드는 변경되지 않는다.
- 커맨드 객체를 로깅, DB에 저장, 네트워크로 전송 하는 등 당양한 방법으로 활용할 수도 있다.
- 단점
- 코드가 복잡하고 클래스가 많아진다.
실무에서 어떻게 쓰이나?
- 자바
- Runnable
- 람다
- 메소드 레퍼런스
public class CommandInJava {

    public static void main(String[] args) {
        Light light = new Light();
        Game game = new Game();
        ExecutorService executorService = Executors.newFixedThreadPool(4);
        executorService.submit(light::on);
        executorService.submit(game::start);
        executorService.submit(game::end);
        executorService.submit(light::off);
        executorService.shutdown();
    }
}
- 스프링
- SimpleJdbcInsert
- SimpleJdbcCall
public class CommandInSpring {

    private DataSource dataSource;

    public CommandInSpring(DataSource dataSource) {
        this.dataSource = dataSource;
    }

    public void add(Command command) {
        SimpleJdbcInsert insert = new SimpleJdbcInsert(dataSource)
                .withTableName("command")
                .usingGeneratedKeyColumns("id");

        Map<String, Object> data = new HashMap<>();
        data.put("name", command.getClass().getSimpleName());
        data.put("when", LocalDateTime.now());
        insert.execute(data);
    }

}
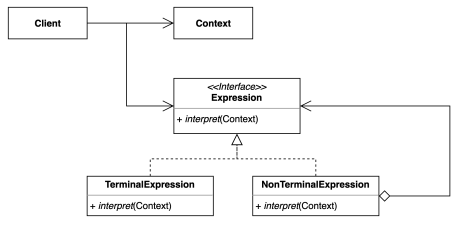
인터프리터 (Interpreter) 패턴
자주 등장하는 문제를 간단한 언어로 정의하고 재사용하는 패턴
- 반복되는 문제 패턴을 언어 또는 문법으로 정의하고 확장할 수 있다.
인터프리터 (Interpreter) 패턴 구현 방법
기존
- PostfixNotation.class
public class PostfixNotation {

    private final String expression;

    public PostfixNotation(String expression) {
        this.expression = expression;
    }

    public static void main(String[] args) {
        PostfixNotation postfixNotation = new PostfixNotation("123+-");
        postfixNotation.calculate();
    }

    private void calculate() {
        Stack<Integer> numbers = new Stack<>();

        for (char c : this.expression.toCharArray()) {
            switch (c) {
                case '+':
                    numbers.push(numbers.pop() + numbers.pop());
                    break;
                case '-':
                    int right = numbers.pop();
                    int left = numbers.pop();
                    numbers.push(left - right);
                    break;
                default:
                    numbers.push(Integer.parseInt(c + ""));
            }
        }

        System.out.println(numbers.pop());
    }
}
변경
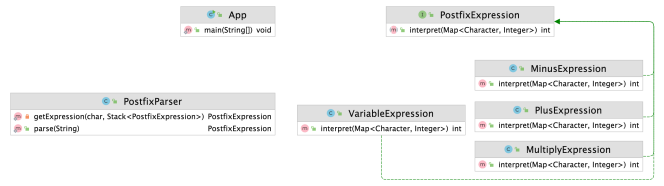
__ 방법 1 __
- PostfixParser.class
public class PostfixParser {

    public static PostfixExpression parse(String expression) {
        Stack<PostfixExpression> stack = new Stack<>();
        for (char c : expression.toCharArray()) {
            stack.push(getExpression(c, stack));
        }
        return stack.pop();
    }

    private static PostfixExpression getExpression(char c, Stack<PostfixExpression> stack) {
        switch (c) {
            case '+':
                return new PlusExpression(stack.pop(), stack.pop());
            case '-':
                PostfixExpression right = stack.pop();
                PostfixExpression left = stack.pop();
                return new MinusExpression(left, right);
            default:
                return new VariableExpression(c);
        }
    }
}
- PostfixExpression.class
public interface PostfixExpression {

    int interpret(Map<Character, Integer> context);

}
- VariableExpression.class
public class VariableExpression implements PostfixExpression {

    private Character character;

    public VariableExpression(Character character) {
        this.character = character;
    }

    @Override
    public int interpret(Map<Character, Integer> context) {
        return context.get(this.character);
    }
}
- PlusExpression.class
public class PlusExpression implements PostfixExpression {

    private PostfixExpression left;

    private PostfixExpression right;

    public PlusExpression(PostfixExpression left, PostfixExpression right) {
        this.left = left;
        this.right = right;
    }

    @Override
    public int interpret(Map<Character, Integer> context) {
        return left.interpret(context) + right.interpret(context);
    }
}
- MinusExpression.class
public class MinusExpression implements PostfixExpression {

    private PostfixExpression left;

    private PostfixExpression right;

    public MinusExpression(PostfixExpression left, PostfixExpression right) {
        this.left = left;
        this.right = right;
    }

    @Override
    public int interpret(Map<Character, Integer> context) {
        return left.interpret(context) - right.interpret(context);
    }
}
- MultiplyExpression.class
public class MultiplyExpression implements PostfixExpression{

    private PostfixExpression left, right;

    public MultiplyExpression(PostfixExpression left, PostfixExpression right) {
        this.left = left;
        this.right = right;
    }

    @Override
    public int interpret(Map<Character, Integer> context) {
        return left.interpret(context) * right.interpret(context);
    }
}
- App.class
public class App {

    public static void main(String[] args) {
        PostfixExpression expression = PostfixParser.parse("xyz+-a+");
        int result = expression.interpret(Map.of('x', 1, 'y', 2, 'z', 3, 'a', 4));
        System.out.println(result);
    }
}
방법2
- PostfixExpression.class
public interface PostfixExpression {

    int interpret(Map<Character, Integer> context);

    static PostfixExpression plus(PostfixExpression left, PostfixExpression right){
        return context -> left.interpret(context) + right.interpret(context);
    }

    static PostfixExpression minus(PostfixExpression left, PostfixExpression right){
        return context -> left.interpret(context) - right.interpret(context);
    }

    static PostfixExpression variable(Character c){
        return context -> context.get(c);
    }
}
- PostfixParser.class
public class PostfixParser {

    public static PostfixExpression parse(String expression) {
        Stack<PostfixExpression> stack = new Stack<>();
        for (char c : expression.toCharArray()) {
            stack.push(getExpression(c, stack));
        }
        return stack.pop();
    }

    private static PostfixExpression getExpression(char c, Stack<PostfixExpression> stack) {
        switch (c) {
            case '+':
                return PostfixExpression.plus(stack.pop(), stack.pop());
            case '-':
                PostfixExpression right = stack.pop();
                PostfixExpression left = stack.pop();
                return PostfixExpression.minus(left, right);
            default:
                return PostfixExpression.variable(c);
        }
    }
}
인터프리터 (Interpreter) 패턴 구현 복습
- 장점
- 자주 등장하는 문제 패턴을 언어와 문법으로 정의할 수 있다.
- 기존 코드를 변경하지 않고 새로운 Expression을 추가 할 수 있다.
- 단점
- 복잡한 문법을 표현하려면 Expression와 Parser가 복잡해진다.
실무에서 어떻게 쓰이나?
- 자바
- 자바 컴파일러
- 정규 표현식
public class InterpreterInJava {

    public static void main(String[] args) {
        System.out.println(Pattern.matches(".pr...", "spring"));
        System.out.println(Pattern.matches("[a-z]{6}", "spring"));
        System.out.println(Pattern.matches("white[a-z]{4}[0-9]{4}", "whiteship2000"));
        System.out.println(Pattern.matches("\\d", "1")); // one digit
        System.out.println(Pattern.matches("\\D", "a")); // one non-digit
    }
}
- 스프링
- SpEL(스프링 Expression Language)
public class InterpreterInSpring {

    public static void main(String[] args) {
        Book book = new Book("spring");

        ExpressionParser parser = new SpelExpressionParser();
        Expression expression = parser.parseExpression("title");
        System.out.println(expression.getValue(book));
    }
}
@Service
public class MyService implements ApplicationRunner {

    @Value("#{2 + 5}")
    private String value;

    @Override
    public void run(ApplicationArguments args) throws Exception {
        System.out.println(value);
    }
}
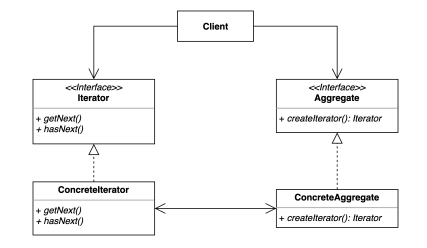
이터레이터 (Interator) 패턴
집합 객체 내부 구조를 노출시키지 않고 순회하는 방법을 제공하는 패턴
- 집합 객체를 순회하는 클라이언트 코드를 변경하지 않고 다양한 순회 방법을 제공할 수 있다.
이터레이터 (Interator) 패턴 구현 방법
기존
- Post.class
public class Post {

    private String title;

    private LocalDateTime createdDateTime;

    public Post(String title) {
        this.title = title;
        this.createdDateTime = LocalDateTime.now();
    }

    public String getTitle() {
        return title;
    }

    public void setTitle(String title) {
        this.title = title;
    }

    public LocalDateTime getCreatedDateTime() {
        return createdDateTime;
    }

    public void setCreatedDateTime(LocalDateTime createdDateTime) {
        this.createdDateTime = createdDateTime;
    }
}
- Board.class
public class Board {

    List<Post> posts = new ArrayList<>();

    public List<Post> getPosts() {
        return posts;
    }

    public void setPosts(List<Post> posts) {
        this.posts = posts;
    }

    public void addPost(String content) {
        this.posts.add(new Post(content));
    }
}
- Client.class
public class Client {

    public static void main(String[] args) {
        Board board = new Board();
        board.addPost("디자인 패턴 게임");
        board.addPost("선생님, 저랑 디자인 패턴 하나 학습하시겠습니까?");
        board.addPost("지금 이 자리에 계신 여러분들은 모두 디자인 패턴을 학습하고 계신 분들입니다.");

        // TODO 들어간 순서대로 순회하기
        List<Post> posts = board.getPosts();
        for (int i = 0 ; i < posts.size() ; i++) {
            Post post = posts.get(i);
            System.out.println(post.getTitle());
        }

        // TODO 가장 최신 글 먼저 순회하기
        Collections.sort(posts, (p1, p2) -> p2.getCreatedDateTime().compareTo(p1.getCreatedDateTime()));
        for (int i = 0 ; i < posts.size() ; i++) {
            Post post = posts.get(i);
            System.out.println(post.getTitle());
        }
    }

}
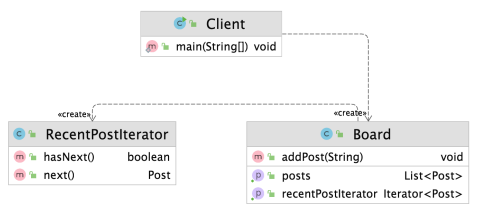
수정
- RecentPostIterator.class
public class RecentPostIterator implements Iterator<Post> {

    private Iterator<Post> internalIterator;

    public RecentPostIterator(List<Post> posts) {
        Collections.sort(posts, (p1, p2) -> p2.getCreatedDateTime().compareTo(p1.getCreatedDateTime()));
        this.internalIterator = posts.iterator();
    }

    @Override
    public boolean hasNext() {
        return this.internalIterator.hasNext();
    }

    @Override
    public Post next() {
        return this.internalIterator.next();
    }
}
- Board.class
public class Board {

    List<Post> posts = new ArrayList<>();

    public List<Post> getPosts() {
        return posts;
    }

    public void addPost(String content) {
        this.posts.add(new Post(content));
    }

    public Iterator<Post> getRecentPostIterator() {
        return new RecentPostIterator(this.posts);
    }


}
- Client.class
public class Client {

    public static void main(String[] args) {
        Board board = new Board();
        board.addPost("디자인 패턴 게임");
        board.addPost("선생님, 저랑 디자인 패턴 하나 학습하시겠습니까?");
        board.addPost("지금 이 자리에 계신 여러분들은 모두 디자인 패턴을 학습하고 계신 분들입니다.");

        // TODO 들어간 순서대로 순회하기
        List<Post> posts = board.getPosts();
        Iterator<Post> iterator = posts.iterator();
        System.out.println(iterator.getClass());

        for (int i = 0 ; i < posts.size() ; i++) {
            Post post = posts.get(i);
            System.out.println(post.getTitle());
        }

        // TODO 가장 최신 글 먼저 순회하기
        Iterator<Post> recentPostIterator = board.getRecentPostIterator();
        while(recentPostIterator.hasNext()) {
            System.out.println(recentPostIterator.next().getTitle());
        }
    }

}
이터레이터 (Interator) 패턴 구현 복습
- 장점
- 집합 객체가 가지고 있는 객체들에 손쉽게 접근할 수 있다.
- 일괄된 인터페이스를 사용해 여러 형태의 집합 구조를 순회할 수 있다.
- 단점
- 클래스가 늘어나고 복잡도가 증가한다.
실무에서 어떻게 쓰이나?
- 자바
- java.util.Enumeration과 java.util.Iterator
- Java StAX (Streaming API for XML)의 Iterator 기반 API
- XmlEventReader, XmlEventWriter
public class IteratorInJava {

    public static void main(String[] args) throws FileNotFoundException, XMLStreamException {
        Enumeration enumeration;
        Iterator iterator;

        Board board = new Board();
        board.addPost("디자인 패턴 게임");
        board.addPost("선생님, 저랑 디자인 패턴 하나 학습하시겠습니까?");
        board.addPost("지금 이 자리에 계신 여러분들은 모두 디자인 패턴을 학습하고 계신 분들입니다.");

//        board.getPosts().iterator().forEachRemaining(p -> System.out.println(p.getTitle()));


        // TODO Streaming API for XML(StAX), 이터레이터 기반의 API
        XMLInputFactory xmlInputFactory = XMLInputFactory.newInstance();
        XMLEventReader reader = xmlInputFactory.createXMLEventReader(new FileInputStream("Book.xml"));

        while (reader.hasNext()) {
            XMLEvent nextEvent = reader.nextEvent();
            if (nextEvent.isStartElement()) {
                StartElement startElement = nextEvent.asStartElement();
                QName name = startElement.getName();
                if (name.getLocalPart().equals("book")) {
                    Attribute title = startElement.getAttributeByName(new QName("title"));
                    System.out.println(title.getValue());
                }
            }
        }
    }
}
- 스프링
- CompositeIterator
public class IteratorInSpring {

    public static void main(String[] args) {
        CompositeIterator iterator;
    }
}
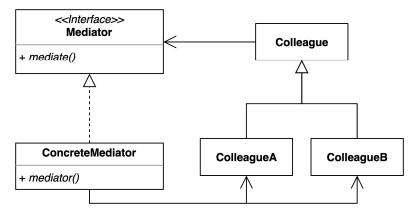
중재자 (Mediator) 패턴
여러 객체들이 소통하는 방법을 캡슐화하는 패턴
- 여러 컴포넌트간의 결합도를 중재자를 통해 낮출 수 있다.
중재자 (Mediator) 패턴 구현 방법
기존
- Guest.class
public class Guest {

    private Restaurant restaurant = new Restaurant();

    private CleaningService cleaningService = new CleaningService();

    public void dinner() {
        restaurant.dinner(this);
    }

    public void getTower(int numberOfTower) {
        cleaningService.getTower(this, numberOfTower);
    }

}
- Gym.class
public class Gym {

    private CleaningService cleaningService;

    public void clean() {
        cleaningService.clean(this);
    }
}
- Restaurant.class
public class Restaurant {

    private CleaningService cleaningService = new CleaningService();
    public void dinner(Guest guest) {
        System.out.println("dinner " + guest);
    }

    public void clean() {
        cleaningService.clean(this);
    }
}
- CleaningService.class
public class CleaningService {
    public void clean(Gym gym) {
        System.out.println("clean " + gym);
    }

    public void getTower(Guest guest, int numberOfTower) {
        System.out.println(numberOfTower + " towers to " + guest);
    }

    public void clean(Restaurant restaurant) {
        System.out.println("clean " + restaurant);
    }
}
- Hotel.class
public class Hotel {

    public static void main(String[] args) {
        Guest guest = new Guest();
        guest.getTower(3);
        guest.dinner();

        Restaurant restaurant = new Restaurant();
        restaurant.clean();
    }
}
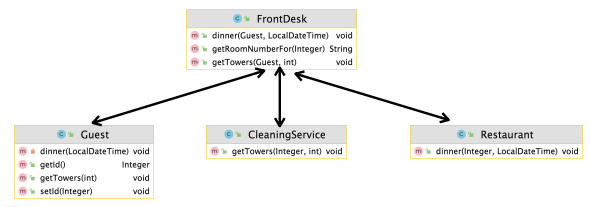
수정
- CleaningService.class
public class CleaningService {

    private FrontDesk frontDesk = new FrontDesk();

    public void getTowers(Integer guestId, int numberOfTowers) {
        String roomNumber = this.frontDesk.getRoomNumberFor(guestId);
        System.out.println("provide " + numberOfTowers + " to " + roomNumber);
    }
}
- Guest.class
public class Guest {

    private Integer id;

    private FrontDesk frontDesk = new FrontDesk();

    public void getTowers(int numberOfTowers) {
        this.frontDesk.getTowers(this, numberOfTowers);
    }

    private void dinner(LocalDateTime dateTime) {
        this.frontDesk.dinner(this, dateTime);
    }

    public Integer getId() {
        return id;
    }

    public void setId(Integer id) {
        this.id = id;
    }
}
- Restaurant.class
public class Restaurant {
    public void dinner(Integer id, LocalDateTime dateTime) {

    }
}
- FrontDesk.class
public class FrontDesk {

    private CleaningService cleaningService = new CleaningService();

    private Restaurant restaurant = new Restaurant();

    public void getTowers(Guest guest, int numberOfTowers) {
        cleaningService.getTowers(guest.getId(), numberOfTowers);
    }

    public String getRoomNumberFor(Integer guestId) {
        return "1111";
    }

    public void dinner(Guest guest, LocalDateTime dateTime) {
        restaurant.dinner(guest.getId(), dateTime);
    }
}
중재자 (Mediator) 패턴 구현 복습
- 장점
- 컴포넌트 코드를 변경하지 않고 새로운 중재자를 만들어 사용할 수 있다.
- 각각의 컴포넌트 코드를 보다 간결하게 유지할 수 있다.
- 단점
- 중재자 역할을 하는 클래스의 복잡도와 결합도가 증가한다.
실무에서 어떻게 쓰이나?
- 자바
- ExecutorService
- Executor
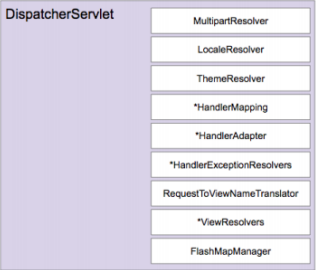
- 스프링
- DispatcherServlet
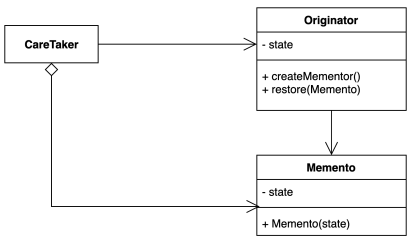
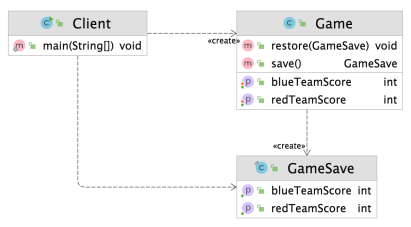
메멘토 (Memento) 패턴
캡슐화를 유지하면서 객체 내부 상태를 외부에 저장하는 방법.
- 객체 상태를 외부에 저장했다가 해당 상태로 다시 복구할 수 있다.
메멘토 (Memento) 패턴 구현 방법
기존
- Game.class
public class Game implements Serializable {

    private int redTeamScore;

    private int blueTeamScore;

    public int getRedTeamScore() {
        return redTeamScore;
    }

    public void setRedTeamScore(int redTeamScore) {
        this.redTeamScore = redTeamScore;
    }

    public int getBlueTeamScore() {
        return blueTeamScore;
    }

    public void setBlueTeamScore(int blueTeamScore) {
        this.blueTeamScore = blueTeamScore;
    }
}
- Client.class
public class Client {

    public static void main(String[] args) {
        Game game = new Game();
        game.setRedTeamScore(10);
        game.setBlueTeamScore(20);

        int blueTeamScore = game.getBlueTeamScore();
        int redTeamScore = game.getRedTeamScore();

        Game restoredGame = new Game();
        restoredGame.setBlueTeamScore(blueTeamScore);
        restoredGame.setRedTeamScore(redTeamScore);
    }
}
변경
- GameSave.class
public final class GameSave {

    private final int blueTeamScore;

    private final int redTeamScore;

    public GameSave(int blueTeamScore, int redTeamScore) {
        this.blueTeamScore = blueTeamScore;
        this.redTeamScore = redTeamScore;
    }

    public int getBlueTeamScore() {
        return blueTeamScore;
    }

    public int getRedTeamScore() {
        return redTeamScore;
    }
}
- Game.class
public class Game {

    private int redTeamScore;

    private int blueTeamScore;

    public int getRedTeamScore() {
        return redTeamScore;
    }

    public void setRedTeamScore(int redTeamScore) {
        this.redTeamScore = redTeamScore;
    }

    public int getBlueTeamScore() {
        return blueTeamScore;
    }

    public void setBlueTeamScore(int blueTeamScore) {
        this.blueTeamScore = blueTeamScore;
    }

    public GameSave save() {
        return new GameSave(this.blueTeamScore, this.redTeamScore);
    }

    public void restore(GameSave gameSave) {
        this.blueTeamScore = gameSave.getBlueTeamScore();
        this.redTeamScore = gameSave.getRedTeamScore();
    }

}
- Clients.class
public class Client {

    public static void main(String[] args) {
        Game game = new Game();
        game.setBlueTeamScore(10);
        game.setRedTeamScore(20);

        GameSave save = game.save();

        game.setBlueTeamScore(12);
        game.setRedTeamScore(22);

        game.restore(save);

        System.out.println(game.getBlueTeamScore());
        System.out.println(game.getRedTeamScore());
    }
}
메멘토 (Memento) 패턴 구현 복습
- 장점
- 캡슐화를 지키면서 상태 객체 상태 스냅샷을 만들 수 있다.
- 객체 상태 저장하고 또는 복원하는 역할을 CareTaker에게 위임할 수 있다.
- 객체 상태가 바뀌어도 클라이언트 코드는 변경되지 않는다.
- 단점
- 많은 정보를 저장하는 Memetor를 자주 생성하는 경우 메모리 사용량에 많은 역향을 줄 수 있다.
실무에서 어떻게 쓰이나?
- 자바
- 객체 직렬화, java.io.Serializable
- java.util.Date
public class MementoInJava {

    public static void main(String[] args) throws IOException, ClassNotFoundException {
        // TODO Serializable
        Game game = new Game();
        game.setRedTeamScore(10);
        game.setBlueTeamScore(20);

        // TODO 직렬화
        try(FileOutputStream fileOut = new FileOutputStream("GameSave.hex");
        ObjectOutputStream out = new ObjectOutputStream(fileOut))
        {
            out.writeObject(game);
        }

        game.setBlueTeamScore(25);
        game.setRedTeamScore(15);

        // TODO 역직렬화
        try(FileInputStream fileIn = new FileInputStream("GameSave.hex");
            ObjectInputStream in = new ObjectInputStream(fileIn))
        {
            game = (Game) in.readObject();
            System.out.println(game.getBlueTeamScore());
            System.out.println(game.getRedTeamScore());
        }
    }
}
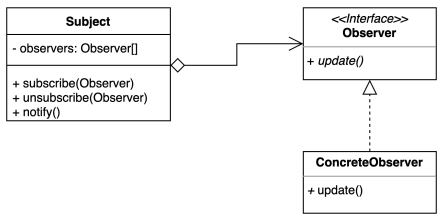
옵저버 (Observer) 패턴
다수의 객체가 특정 객체 상태 변화를 감지하고 알림을 받는 패턴.
- 발행(publish)-구독(subscribe) 패턴을 구현할 수 있다.
옵저버 (Observer) 패턴 구현 방법
기존
- ChatServer.class
public class ChatServer {

    private Map<String, List<String>> messages;

    public ChatServer() {
        this.messages = new HashMap<>();
    }


    public void add(String subject, String message) {
        if (messages.containsKey(subject)) {
            messages.get(subject).add(message);
        } else {
            List<String> messageList = new ArrayList<>();
            messageList.add(message);
            messages.put(subject, messageList);
        }
    }

    public List<String> getMessage(String subject) {
        return messages.get(subject);
    }
}
- User.class
public class User {

    private ChatServer chatServer;

    public User(ChatServer chatServer) {
        this.chatServer = chatServer;
    }


    public void sendMessage(String subject, String message) {
        chatServer.add(subject, message);
    }

    public List<String> getMessage(String subject) {
        return chatServer.getMessage(subject);
    }
}
- Client.class
public class Client {

    public static void main(String[] args) {
        ChatServer chatServer = new ChatServer();

        User user1 = new User(chatServer);
        user1.sendMessage("디자인패턴", "이번엔 옵저버 패턴입니다.");
        user1.sendMessage("롤드컵2021", "LCK 화이팅!");

        User user2 = new User(chatServer);
        System.out.println(user2.getMessage("디자인패턴"));

        user1.sendMessage("디자인패턴", "예제 코드 보는 중..");
        System.out.println(user2.getMessage("디자인패턴"));
    }
}
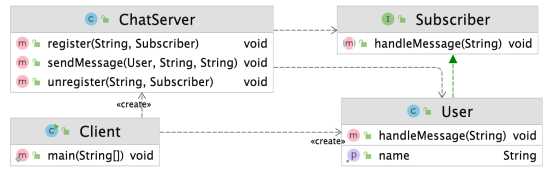
변경
- Subscriber.class
public interface Subscriber {

    void handleMessage(String message);
}
- User.class
public class User implements Subscriber {

    private String name;

    public User(String name) {
        this.name = name;
    }

    public String getName() {
        return name;
    }

    @Override
    public void handleMessage(String message) {
        System.out.println(message);
    }
}
- ChatServer.class
public class ChatServer {

    private Map<String, List<Subscriber>> subscribers = new HashMap<>();

    public void register(String subject, Subscriber subscriber) {
        if (this.subscribers.containsKey(subject)) {
            this.subscribers.get(subject).add(subscriber);
        } else {
            List<Subscriber> list = new ArrayList<>();
            list.add(subscriber);
            this.subscribers.put(subject, list);
        }
    }

    public void unregister(String subject, Subscriber subscriber) {
        if (this.subscribers.containsKey(subject)) {
            this.subscribers.get(subject).remove(subscriber);
        }
    }

    public void sendMessage(User user, String subject, String message) {
        if (this.subscribers.containsKey(subject)) {
            String userMessage = user.getName() + ": " + message;
            this.subscribers.get(subject).forEach(s -> s.handleMessage(userMessage));
        }
    }

}
- Client.class
public class Client {

    public static void main(String[] args) {
        ChatServer chatServer = new ChatServer();
        User user1 = new User("keesun");
        User user2 = new User("whiteship");

        chatServer.register("오징어게임", user1);
        chatServer.register("오징어게임", user2);

        chatServer.register("디자인패턴", user1);

        chatServer.sendMessage(user1, "오징어게임", "아.. 이름이 기억났어.. 일남이야.. 오일남");
        chatServer.sendMessage(user2, "디자인패턴", "옵저버 패턴으로 만든 채팅");

        chatServer.unregister("디자인패턴", user2);

        chatServer.sendMessage(user2, "디자인패턴", "옵저버 패턴 장, 단점 보는 중");
    }
}
옵저버 (Observer) 패턴 구현 복습
- 장점
- 상태를 변경하는 객체(publisher)와 변경을 감지하는 객체(subscribe)의 관계를 느슨하게 유지할 수 있다.
- Subject의 상태 변경을 주기적으로 조회하지 않고 자동으로 감지할 수 있다.
- 런타임에 옵저버를 추가하거나 제거할 수 있다.
- 단점
- 복잡도가 증가한다.
- 다수의 Observer 객체를 등록 이후 해지 않는다면 memory leak이 발생할 수도 있다.
- WeakReference 를 활용 방안이 있다., 명시적으로 해지 하는게 최우선이다.
실무에서 어떻게 쓰이나?
- 자바
- Observable과 Observer (자바 9부터 deprecated)
- 자바 9 이후 부터는
- PropertyChangeListener, PropertyChangeEvent
- Flow API
- SAX (Simple API for XML) 라이브러리
public class ObserverInJava {

    static class User implements Observer {
        @Override
        public void update(Observable o, Object arg) {
            System.out.println(arg);
        }
    }

    static class Subject extends Observable {
        public void add(String message) {
            setChanged();
            notifyObservers(message);
        }
    }

    public static void main(String[] args) {
        Subject subject = new Subject();
        User user = new User();
        subject.addObserver(user);
        subject.add("Hello Java, Observer");
    }

}
public class PropertyChangeExample {

    static class User implements PropertyChangeListener {

        @Override
        public void propertyChange(PropertyChangeEvent evt) {
            System.out.println(evt.getNewValue());
        }
    }

    static class Subject {
        PropertyChangeSupport support = new PropertyChangeSupport(this);

        public void addObserver(PropertyChangeListener observer) {
            support.addPropertyChangeListener(observer);
        }

        public void removeObserver(PropertyChangeListener observer) {
            support.removePropertyChangeListener(observer);
        }

        public void add(String message) {
            support.firePropertyChange("eventName", null, message);
        }
    }

    public static void main(String[] args) {
        Subject subject = new Subject();
        User observer = new User();
        subject.addObserver(observer);
        subject.add("자바 PCL 예제 코드");
        subject.removeObserver(observer);
        subject.add("이 메시지는 볼 수 없지..");
    }

}
public class FlowInJava {

    public static void main(String[] args) throws InterruptedException {
        Flow.Publisher<String> publisher = new SubmissionPublisher<>();

        Flow.Subscriber<String> subscriber = new Flow.Subscriber<String>() {

            private Flow.Subscription subscription;

            @Override
            public void onSubscribe(Flow.Subscription subscription) {
                System.out.println("sub!");
                this.subscription = subscription;
                this.subscription.request(1);
            }

            @Override
            public void onNext(String item) {
                System.out.println("onNext called");
                System.out.println(Thread.currentThread().getName());
                System.out.println(item);
            }

            @Override
            public void onError(Throwable throwable) {
            }

            @Override
            public void onComplete() {
                System.out.println("completed");
            }
        };

        publisher.subscribe(subscriber);

        ((SubmissionPublisher)publisher).submit("hello java");

        System.out.println("이게 먼저 출력될 수도 있습니다.");
    }
}
- 스프링
- ApplicationContext와 ApplicationEvent
public class MyEvent {

    private String message;

    public MyEvent(String message) {
        this.message = message;
    }

    public String getMessage() {
        return message;
    }
}
@Component
public class MyEventListener {

    @EventListener(MyEvent.class)
    public void onApplicationEvent(MyEvent event) {
        System.out.println(event.getMessage());
    }
}
@Component
public class MyRunner implements ApplicationRunner {

    private ApplicationEventPublisher publisher;

    public MyRunner(ApplicationEventPublisher publisher) {
        this.publisher = publisher;
    }

    @Override
    public void run(ApplicationArguments args) throws Exception {
        publisher.publishEvent(new MyEvent("hello spring event"));
    }
}
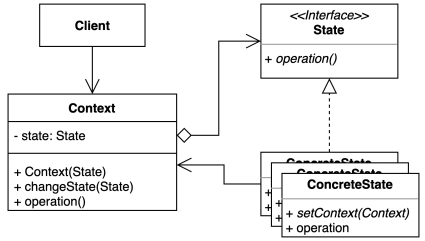
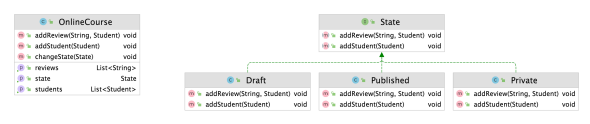
상태 (State) 패턴
객체 내부 상태 변경에 따라 객체의 행동이 달라지는 패턴.
- 상태에 특화된 행동들을 분리해 낼 수 있으며, 새로운 행동이 추가하더라도 다른 행동에 영향을 주지 않는다.
상태 (State) 패턴 구현 방법
기존
- Student.class
public class Student {

    private String name;

    public Student(String name) {
        this.name = name;
    }

    private List<OnlineCourse> privateCourses = new ArrayList<>();

    public boolean isEnabledForPrivateClass(OnlineCourse onlineCourse) {
        return privateCourses.contains(onlineCourse);
    }

    public void addPrivateCourse(OnlineCourse onlineCourse) {
        this.privateCourses.add(onlineCourse);
    }

    @Override
    public String toString() {
        return "Student{" +
                "name='" + name + '\'' +
                '}';
    }
}
- OnlineCourse.class
public class OnlineCourse {

    public enum State {
        DRAFT, PUBLISHED, PRIVATE
    }

    private State state = State.DRAFT;

    private List<String> reviews = new ArrayList<>();

    private List<Student> students = new ArrayList<>();

    public void addReview(String review, Student student) {
        if (this.state == State.PUBLISHED) {
            this.reviews.add(review);
        } else if (this.state == State.PRIVATE && this.students.contains(student)) {
            this.reviews.add(review);
        } else {
            throw new UnsupportedOperationException("리뷰를 작성할 수 없습니다.");
        }
    }

    public void addStudent(Student student) {
        if (this.state == State.DRAFT || this.state == State.PUBLISHED) {
            this.students.add(student);
        } else if (this.state == State.PRIVATE && availableTo(student)) {
            this.students.add(student);
        } else {
            throw new UnsupportedOperationException("학생을 해당 수업에 추가할 수 없습니다.");
        }

        if (this.students.size() > 1) {
            this.state = State.PRIVATE;
        }
    }

    public void changeState(State newState) {
        this.state = newState;
    }

    public State getState() {
        return state;
    }

    public List<String> getReviews() {
        return reviews;
    }

    public List<Student> getStudents() {
        return students;
    }

    private boolean availableTo(Student student) {
        return student.isEnabledForPrivateClass(this);
    }


}
- Client.class
public class Client {

    public static void main(String[] args) {
        Student student = new Student("whiteship");
        OnlineCourse onlineCourse = new OnlineCourse();

        Student test = new Student("test");
        keesun.addPrivateCourse(onlineCourse);

        onlineCourse.addStudent(student);
        onlineCourse.changeState(OnlineCourse.State.PRIVATE);

        onlineCourse.addStudent(test);

        onlineCourse.addReview("hello", student);

        System.out.println(onlineCourse.getState());
        System.out.println(onlineCourse.getStudents());
        System.out.println(onlineCourse.getReviews());
    }
}
변경
- State.class
public interface State {

    void addReview(String review, Student student);

    void addStudent(Student student);
}
- Draft.class
public class Draft implements State {

    private OnlineCourse onlineCourse;

    public Draft(OnlineCourse onlineCourse) {
        this.onlineCourse = onlineCourse;
    }

    @Override
    public void addReview(String review, Student student) {
        throw new UnsupportedOperationException("드래프트 상태에서는 리뷰를 남길 수 없습니다.");
    }

    @Override
    public void addStudent(Student student) {
        this.onlineCourse.getStudents().add(student);
        if (this.onlineCourse.getStudents().size() > 1) {
            this.onlineCourse.changeState(new Private(this.onlineCourse));
        }
    }
}
- Private.class
public class Private implements State {

    private OnlineCourse onlineCourse;

    public Private(OnlineCourse onlineCourse) {
        this.onlineCourse = onlineCourse;
    }

    @Override
    public void addReview(String review, Student student) {
        if (this.onlineCourse.getStudents().contains(student)) {
            this.onlineCourse.getReviews().add(review);
        } else {
            throw new UnsupportedOperationException("프라이빗 코스를 수강하는 학생만 리뷰를 남길 수 있습니다.");
        }
    }

    @Override
    public void addStudent(Student student) {
        if (student.isAvailable(this.onlineCourse)) {
            this.onlineCourse.getStudents().add(student);
        } else {
            throw new UnsupportedOperationException("프라이빛 코스를 수강할 수 없습니다.");
        }
    }
}
- Published.class
public class Published implements State {

    private OnlineCourse onlineCourse;

    public Published(OnlineCourse onlineCourse) {
        this.onlineCourse = onlineCourse;
    }

    @Override
    public void addReview(String review, Student student) {
        this.onlineCourse.getReviews().add(review);
    }

    @Override
    public void addStudent(Student student) {
        this.onlineCourse.getStudents().add(student);
    }
}
- OnlineCourse.class
public class OnlineCourse {

    private State state = new Draft(this);

    private List<Student> students = new ArrayList<>();

    private List<String> reviews = new ArrayList<>();

    public void addStudent(Student student) {
        this.state.addStudent(student);
    }

    public void addReview(String review, Student student) {
        this.state.addReview(review, student);
    }

    public State getState() {
        return state;
    }

    public List<Student> getStudents() {
        return students;
    }

    public List<String> getReviews() {
        return reviews;
    }

    public void changeState(State state) {
        this.state = state;
    }
}
- Student.class
public class Student {

    private String name;

    public Student(String name) {
        this.name = name;
    }

    private Set<OnlineCourse> onlineCourses = new HashSet<>();

    public boolean isAvailable(OnlineCourse onlineCourse) {
        return onlineCourses.contains(onlineCourse);
    }

    public void addPrivate(OnlineCourse onlineCourse) {
        this.onlineCourses.add(onlineCourse);
    }

    @Override
    public String toString() {
        return "Student{" +
                "name='" + name + '\'' +
                '}';
    }
}
- Client.class
public class Client {

    public static void main(String[] args) {
        OnlineCourse onlineCourse = new OnlineCourse();
        Student student = new Student("whiteship");
        Student test = new Student("test");
        keesun.addPrivate(onlineCourse);

        onlineCourse.addStudent(student);

        onlineCourse.changeState(new Private(onlineCourse));

        onlineCourse.addReview("hello", student);

        onlineCourse.addStudent(test);

        System.out.println(onlineCourse.getState());
        System.out.println(onlineCourse.getReviews());
        System.out.println(onlineCourse.getStudents());
    }
}
상태 (State) 패턴 구현 복습
- 장점
- 상태에 따른 동작을 개별 클래스로 옮겨서 관리할 수 있다.
- 기존의 특정 상태에 따른 동작을 변경하지 않고 새로운 상태에 다른 동작을 추가할 수 있다.
- 코드 복잡도를 줄일 수 있다.
- 단점
- 복잡도가 증가한다.
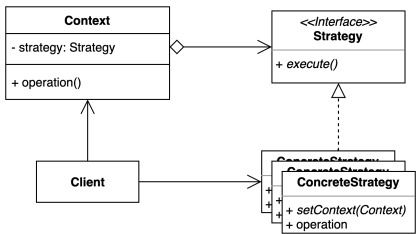
전략 (Strategy) 패턴
여러 알고리듬을 캡슐화하고 상호 교환 가능하게 만드는 패턴
- 컨텍스트에서 사용할 알고리듬을 클라이언트가 선택한다.
전략 (Strategy) 패턴 구현 방법
기존
- BlueLightRedLight.class
public class BlueLightRedLight {

    private int speed;

    public BlueLightRedLight(int speed) {
        this.speed = speed;
    }

    public void blueLight() {
        if (speed == 1) {
            System.out.println("무 궁 화    꽃   이");
        } else if (speed == 2) {
            System.out.println("무궁화꽃이");
        } else {
            System.out.println("무광꼬치");
        }

    }

    public void redLight() {
        if (speed == 1) {
            System.out.println("피 었 습 니  다.");
        } else if (speed == 2) {
            System.out.println("피었습니다.");
        } else {
            System.out.println("피어씀다");
        }
    }
}
- Client.class
public class Client {

    public static void main(String[] args) {
        BlueLightRedLight blueLightRedLight = new BlueLightRedLight(3);
        blueLightRedLight.blueLight();
        blueLightRedLight.redLight();
    }
}
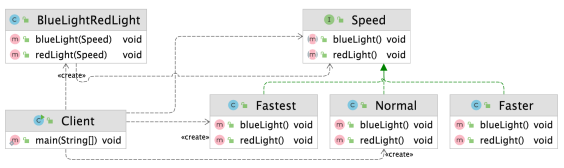
변경
- Speed.class
public interface Speed {

    void blueLight();

    void redLight();

}
- Normal.class
public class Normal implements Speed {
    @Override
    public void blueLight() {
        System.out.println("무 궁 화    꽃   이");
    }

    @Override
    public void redLight() {
        System.out.println("피 었 습 니  다.");
    }
}
- Faster.class
public class Faster implements Speed {
    @Override
    public void blueLight() {
        System.out.println("무궁화꽃이");
    }

    @Override
    public void redLight() {
        System.out.println("피었습니다.");
    }
}
- Fastest.class
public class Fastest implements Speed{
    @Override
    public void blueLight() {
        System.out.println("무광꼬치");
    }

    @Override
    public void redLight() {
        System.out.println("피어씀다.");
    }
}
- BlueLightRedLight.class
public class BlueLightRedLight {

    public void blueLight(Speed speed) {
        speed.blueLight();
    }

    public void redLight(Speed speed) {
        speed.redLight();
    }
}
- Client.class
public class Client {

    public static void main(String[] args) {
        BlueLightRedLight game = new BlueLightRedLight();
        game.blueLight(new Normal());
        game.redLight(new Fastest());
        game.blueLight(new Speed() {
            @Override
            public void blueLight() {
                System.out.println("blue light");
            }

            @Override
            public void redLight() {
                System.out.println("red light");
            }
        });
    }
}
전략 (Strategy) 패턴 구현 복습
- 장점
- 새로운 전략을 추가하더라도 기존 코드를 변경하지 않는다.
- 상속 대신 위임을 사용할 수 있다,
- 런타임에 전략을 변경할 수 있다.
- 단점
- 복잡도가 증가한다.
- 클라이언트 코드가 구체적인 전략을 알아야한다.
실무에서 어떻게 쓰이나?
- 자바
- Comparator
public class StrategyInJava {

    public static void main(String[] args) {
        List<Integer> numbers = new ArrayList<>();
        numbers.add(10);
        numbers.add(5);

        System.out.println(numbers);

        Collections.sort(numbers, Comparator.naturalOrder());

        System.out.println(numbers);
    }
}
- 스프링
- ApplicationContext
- PlatformTransactionManager
- 등등, 너무 많다.
public class StrategyInSpring {

    public static void main(String[] args) {
        ApplicationContext applicationContext = new ClassPathXmlApplicationContext();
        ApplicationContext applicationContext1 = new FileSystemXmlApplicationContext();
        ApplicationContext applicationContext2 = new AnnotationConfigApplicationContext();

        BeanDefinitionParser parser;

        PlatformTransactionManager platformTransactionManager;

        CacheManager cacheManager;
    }
}
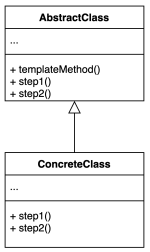
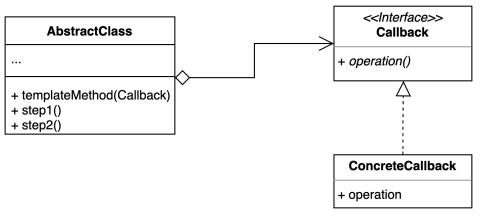
템플릿 메소드 (Template method) 패턴
알고리듬 구조를 서브 클래스가 확장할 수 있도록 템플릿으로 제공하는 방법.
- 추상 클래스는 템플릿을 제공하고 하위 클래스는 구체적인 알골리듬을 제공한다.
템플릿 콜백 (Template-Callback) 패턴
콜백으로 상속 대신 위임을 사용하는 템플릿 패턴
- 상속 대신 익명 내부 클래스 또는 람다 표현식을 활용할 수 있다.
템플릿 메소드 (Template method) 패턴 구현 방법
기존
- FileProcessor.class
public class FileProcessor {

    private String path;
    public FileProcessor(String path) {
        this.path = path;
    }

    public int process() {
        try(BufferedReader reader = new BufferedReader(new FileReader(path))) {
            int result = 0;
            String line = null;
            while((line = reader.readLine()) != null) {
                result += Integer.parseInt(line);
            }
            return result;
        } catch (IOException e) {
            throw new IllegalArgumentException(path + "에 해당하는 파일이 없습니다.", e);
        }
    }
}
- MultuplyFileProcessor.class
public class MultuplyFileProcessor {

    private String path;
    public MultuplyFileProcessor(String path) {
        this.path = path;
    }

    public int process() {
        try(BufferedReader reader = new BufferedReader(new FileReader(path))) {
            int result = 0;
            String line = null;
            while((line = reader.readLine()) != null) {
                result *= Integer.parseInt(line);
            }
            return result;
        } catch (IOException e) {
            throw new IllegalArgumentException(path + "에 해당하는 파일이 없습니다.", e);
        }
    }
}
- Client.class
public class Client {

    public static void main(String[] args) {
        FileProcessor fileProcessor = new FileProcessor("number.txt");
        int result = fileProcessor.process();
        System.out.println(result);
    }
}
변경
템플릿 메서드 패턴
- FileProcessor.class
public abstract class FileProcessor {

    private String path;
    public FileProcessor(String path) {
        this.path = path;
    }

    public int process() {
        try(BufferedReader reader = new BufferedReader(new FileReader(path))) {
            int result = 0;
            String line = null;
            while((line = reader.readLine()) != null) {
                result = getResult(result, Integer.parseInt(line));
            }
            return result;
        } catch (IOException e) {
            throw new IllegalArgumentException(path + "에 해당하는 파일이 없습니다.", e);
        }
    }

    protected abstract int getResult(int result, int number);

}
- Multiply.class
public class Multiply extends FileProcessor {
  public Multiply(String path) {
    super(path);
  }

  @Override
  protected int getResult(int result, int number) {
    return result *= number;
  }

}
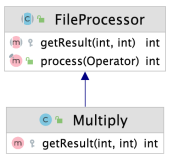
템플릿 콜백 패턴
- Operator.class
public interface Operator {

    abstract int getResult(int result, int number);
}
- FileProcessor.class
public class FileProcessor {

    private String path;
    public FileProcessor(String path) {
        this.path = path;
    }

    public final int process(Operator operator) {
        try(BufferedReader reader = new BufferedReader(new FileReader(path))) {
            int result = 0;
            String line = null;
            while((line = reader.readLine()) != null) {
                result = operator.getResult(result, Integer.parseInt(line));
            }
            return result;
        } catch (IOException e) {
            throw new IllegalArgumentException(path + "에 해당하는 파일이 없습니다.", e);
        }
    }

}
- Plus.class
public class Plus implements Operator {
    @Override
    public int getResult(int result, int number) {
        return result += number;
    }
}
- Client.class
public class Client {

    public static void main(String[] args) {
        FileProcessor fileProcessor = new Multiply("number.txt");
        int result = fileProcessor.process((sum, number) -> sum += number);
        System.out.println(result);
    }
}
템플릿 메소드 (Template method) 패턴 구현 복습
- 장점
- 템플릿 코드를 재사용하고 중복 코드를 줄일 수 있다.
- 템플릿 코드를 변경하지 않고 상속을 받아서 구체적인 알고리듬만 변경할 수 있다.
- 단점
- 리스코프 치환 원칙을 위반할 수도 있다.
- 알고리듬 구조가 복잡할 수록 템플릿을 유지하기 어려워진다.
실무에서 어떻게 쓰이나?
- 자바
- HttpServlet
public class MyHello extends HttpServlet {

    @Override
    protected void doGet(HttpServletRequest req, HttpServletResponse resp) throws ServletException, IOException {
        super.doGet(req, resp);
    }

    @Override
    protected void doPost(HttpServletRequest req, HttpServletResponse resp) throws ServletException, IOException {
        super.doPost(req, resp);
    }
}
- 스프링
- 템플릿 메소드 패턴
- Configuration
- 템플릿 콜백 패턴
- JdbcTemplate
- RestTemplate
- 등등
- 템플릿 메소드 패턴
public class TemplateInSpring {

    public static void main(String[] args) {
        // TODO 템플릿-콜백 패턴
        // JdbcTemplate
        JdbcTemplate jdbcTemplate = new JdbcTemplate();
        jdbcTemplate.execute("insert");

        // RestTemplate
        RestTemplate restTemplate = new RestTemplate();

        HttpHeaders headers = new HttpHeaders();
        headers.setAccept(Arrays.asList(MediaType.APPLICATION_JSON));
        headers.set("X-COM-PERSIST", "NO");
        headers.set("X-COM-LOCATION", "USA");

        HttpEntity<String> entity = new HttpEntity<String>(headers);
        ResponseEntity<String> responseEntity = restTemplate
                .exchange("http://localhost:8080/users", HttpMethod.GET, entity, String.class);
    }

    @Configuration
    class SecurityConfig extends WebSecurityConfigurerAdapter {

        @Override
        protected void configure(HttpSecurity http) throws Exception {
            http.authorizeRequests().anyRequest().permitAll();
        }
    }
}
방문자 (Visitor) 패턴
기존 코드를 변경하지 않고 새로운 기능을 추가하는 방법
- 더블 디스패치 (Double Dispatch)를 활용할 수 있다.
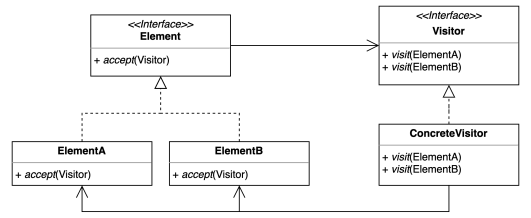
방문자 (Visitor) 패턴 구현 방법
기존
- Device.class
public interface Device {
}
- Phone.class
public class Phone implements Device{
}
- Watch.class
public class Watch implements Device{
}
- Shape.class
public interface Shape {

    void printTo(Device device);

}
- Triangle.class
public class Triangle implements Shape {

    @Override
    public void printTo(Device device) {
        if (device instanceof Phone) {
            System.out.println("print Triangle to Phone");
        } else if (device instanceof Watch) {
            System.out.println("print Triangle to Watch");
        }
    }

}
- Circle.class
public class Circle implements Shape {
  @Override
  public void printTo(Device device) {
    if (device instanceof Phone) {
      System.out.println("print Circle to phone");
    } else if (device instanceof Watch) {
      System.out.println("print Circle to watch");
    }
  }
}
- Client.class
public class Client {

    public static void main(String[] args) {
        Shape rectangle = new Rectangle();
        Device device = new Phone();
        rectangle.printTo(device);
    }
}
변경
- Device.class
public interface Device {
    void print(Circle circle);

    void print(Rectangle rectangle);

    void print(Triangle triangle);
}
- Pad.class
public class Pad implements Device {
    @Override
    public void print(Circle circle) {
        System.out.println("Print Circle to Pad");
    }

    @Override
    public void print(Rectangle rectangle) {
        System.out.println("Print Rectangle to Pad");
    }

    @Override
    public void print(Triangle triangle) {
        System.out.println("Print Triangle to Pad");
    }
}
- Phone.class
public class Phone implements Device {

    @Override
    public void print(Circle circle) {
        System.out.println("Print Circle to Phone");
    }

    @Override
    public void print(Rectangle rectangle) {
        System.out.println("Print Rectangle to Phone");

    }

    @Override
    public void print(Triangle triangle) {
        System.out.println("Print Triangle to Phone");
    }
}
- Watch.class
public class Watch implements Device {
    @Override
    public void print(Circle circle) {
        System.out.println("Print Circle to Watch");
    }

    @Override
    public void print(Rectangle rectangle) {
        System.out.println("Print Rectangle to Watch");
    }

    @Override
    public void print(Triangle triangle) {
        System.out.println("Print Triangle to Watch");
    }
}
- Shape.class
public interface Shape {

    void accept(Device device);

}
- Circle.class
public class Circle implements Shape {

    @Override
    public void accept(Device device) {
        device.print(this);
    }
}
- Triangle.class
public class Triangle implements Shape {

    @Override
    public void accept(Device device) {
        device.print(this);
    }
}
- Rectangle.class
public class Rectangle implements Shape {

    @Override
    public void accept(Device device) {
        device.print(this);
    }
}
- Client.class
public class Client {

    public static void main(String[] args) {
        Shape rectangle = new Rectangle();
        Device device = new Pad();
        rectangle.accept(device);
    }
}
방문자 (Visitor) 패턴 구현 복습
- 장점
- 기존 코드를 변경하지 않고 새로운 코드를 추가할 수 있다.
- 추가 기능을 한 곳에 모아둘 수 있다.
- 단점
- 복잡하다.
- 새로운 Element를 추가하거나 제거할 때 모든 Visitor 코드를 변경해야 한다.
실무에서 어떻게 쓰이나?
- 자바
- FileVisitor, SimpleFileVisitor
- AnnotationValueVisitor
- ElementVisitor
public class SearchFileVisitor implements FileVisitor<Path> {

    private String fileToSearch;
    private Path startingDirectory;

    public SearchFileVisitor(String fileToSearch, Path startingDirectory) {
        this.fileToSearch = fileToSearch;
        this.startingDirectory = startingDirectory;
    }

    @Override
    public FileVisitResult preVisitDirectory(Path dir, BasicFileAttributes attrs) throws IOException {
        return FileVisitResult.CONTINUE;
    }

    @Override
    public FileVisitResult visitFile(Path file, BasicFileAttributes attrs) throws IOException {
        if (fileToSearch.equals(file.getFileName().toString())) {
            System.out.println("found " + file.getFileName());
            return FileVisitResult.TERMINATE;
        }
        return FileVisitResult.CONTINUE;
    }

    @Override
    public FileVisitResult visitFileFailed(Path file, IOException exc) throws IOException {
        exc.printStackTrace(System.out);
        return FileVisitResult.CONTINUE;
    }

    @Override
    public FileVisitResult postVisitDirectory(Path dir, IOException exc) throws IOException {
        if (Files.isSameFile(startingDirectory, dir)) {
            System.out.println("search end");
            return FileVisitResult.TERMINATE;
        }
        return FileVisitResult.CONTINUE;
    }
}
public class VisitorInJava {

    public static void main(String[] args) throws IOException {
        Path startingDirectory = Path.of("/Users/test/workspace/design-patterns");
        SearchFileVisitor searchFileVisitor =
                new SearchFileVisitor("Triangle.java", startingDirectory);
        Files.walkFileTree(startingDirectory, searchFileVisitor);
    }
}
- 스프링
- BeanDefinitionVisitor
public class VisitorInSpring {

    public static void main(String[] args) {
        BeanDefinitionVisitor beanDefinitionVisitor;
    }
}