코딩으로 학습하는 GoF의 디자인 패턴
생성 패턴(Creational Patterns)
카테고리 : 코딩으로 학습하는 GoF의 디자인 패턴
생성 패턴(Creational Patterns)
- 생성 패턴(Creational Patterns)
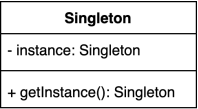
싱글톤 (Singleton) 패턴
- 인스턴스를 오직 한개만 제공하는 클래스
- 시스템 런타임, 환경 세팅에 대한 정보 등, 인스턴스가 여러개 일 때 문제가 생길 수 있는 경우가 있다. 인스턴스를 오직 한개만 만들어 제공하는 클래스가 필요하다
- 권장되는 두 가지는 Holder 를 사용하는 것과, Enum 을 사용하는 것이다.
싱글톤 (Singleton) 패턴 구현 방법 1
- private 생성자에 static 메소드
/**
 * private 생성자와 public static 메소드를 사용하는 방법
 */
public class Settings1 {

    private static Settings1 instance;

    private Settings1() { }

    public static Settings1 getInstance() {
        if (instance == null) {
            instance = new Settings1();
        }

        return instance;
    }

}
- 생성자를 private으로 만든 이유?
- 오직 한 개의 인스턴스에만 접근하기 위해 생성자의 노출을 막기 위해서이다.
- getInstance() 메소드를 static으로 선언한 이유?
- 글로벌하게 접근하게 만들기 위해 static 으로 선언하고, 이는 JVM에 클래스 영역에 생성되어 글로벌하게 사용할 수 있다.
- getInstance()가 멀티쓰레드 환경에서 안전하지 않은 이유?
- 특히 웹 애플리케이션을 만들 때 멀티 스레드를 사용하게 된다.
- 멀티쓰레드 환경에서는 오직 한 개의 인스턴스가 아니게 됩니다. 새롭게 생성된 인스턴스에서도 instance가 null인지 여부를 판단하게 된다. 이때 새로운 스레드에는 생성된 instance 가 없기 때문에 한 개의 인스턴스를 보장할 수 없다.
싱글톤 (Singleton) 패턴 구현 방법 2
- 동기화(synchronized)를 사용해 멀티쓰레드 환경에 안전하게 만드는 방법
/**
 * synchronized 사용해서 동기화 처리
 */
public class Settings2 {

    private static Settings2 instance;

    private Settings2() { }

    public static synchronized Settings2 getInstance() {
        if (instance == null) {
            instance = new Settings2();
        }

        return instance;
    }

}
- 자바의 동기화 블럭 처리 방법은?
- 정확하게는 메서드에 synchronized하는데, 메소드 전체가 임계영역으로 설정된다. 임계 영역으로 설정된 부분은 쓰레드가 synchronized 메소드가 호출된 시점부터 해당 메소드가 포함된 객체의 Lock을 얻어 작업을 수행하다가 메소드가 종료되면 Lock을 반환한다.
- getInstance() 메소드 동기화시 사용하는 락(lock)은 인스턴스의 락인가 클래스의 락인가? 그 이유는?
- 클래스의 락이다. 만약 락이 인스턴스의 락이라면, 동기화시 하나의 객체를 보장할 수 없게 되기 때문이다.
싱글톤 (Singleton) 패턴 구현 방법 3
- 이른 초기화 (eager initialization)을 사용하는 방법
- 객체를 꼭 나중에 만들지 않아도 되고 , 해당 객체를 만드는 비용이 비싸지 않다면
public class Settings3 {

    private static final Settings3 INSTANCE = new Settings3();

    private Settings3() { }

    public static Settings3 getInstance() {
        return INSTANCE;
    }

}
- 이른 초기화가 단점이 될 수도 있는 이유?
- 미리 만들게 되는 것이 단점이 될 수 있는데, 만약 생성자에 많은 리소스를 사용되는 경우에는 좋지 않다.
- 만약에 생성자에서 checked 예외를 던진다면 이 코드를 어떻게 변경해야 할까요?
- 만약 생성자에서 예외를 던진다면, 그 안에서 try-catch 으로 예외 핸들링을 해야만 한다. 그렇지 않다면, 이른 초기화를 사용할 수 없다.
싱글톤 (Singleton) 패턴 구현 방법 4
- double checked locking으로 효율적인 동기화 블럭 만들기
- java 1.5 이상에서 동작
/**
 * double checked locking
 */
public class Settings4 {

    private static volatile Settings4 instance;

    private Settings4() { }

    public static Settings4 getInstance() {
        if (instance == null) {
            synchronized (Settings4.class) {
                if (instance == null) {
                    instance = new Settings4();
                }
            }
        }

        return instance;
    }

}
- double check locking이라고 부르는 이유?
- 2번에 걸쳐 단 하나의 객체임을 체크하기 때문이다. if 문이 2번 사용되는데, 첫번째는 instance가 null일 경우와, 동기화 클래스 synchronized(xx.class) 에서 한번 더 체크하기 때문입이다. 동기화 매커니즘을 사용하지 않습니다. 만약 instance가 있다면 바로 리턴하기 때문이다.
- instance 변수는 어떻게 정의해야 하는가? 그 이유는?
- volatile 을 사용하여 가장 최신의 객체를 가져오도록 한다. Multi Thread 환경에서 하나의 Thread만 read & write하고 나머지 Thread가 read하는 상황에서 가장 최신의 값을 보장한다.
싱글톤 (Singleton) 패턴 구현 방법 5
- static inner 클래스를 사용하는 방법
- 권장하는 방법중 하나.
/**
 * static inner 클래스 홀더
 */
public class Settings5 {

    private Settings5() { }

    private static class Settings5Holder {
        private static final Settings5 INSTANCE = new Settings5();
    }

    public static Settings5 getInstance() {
        return Settings5Holder.INSTANCE;
    }

}
- 이 방법은 static final 를 썻는데도 왜 지연 초기화(lazy intialization)라고 볼 수 있는가?
- Holder를 통해 객체를 생성하게 되는데, 이렇게 할 경우 getIntance() 가 호출될 때 로딩되기 때문이다.
싱글톤 (Singleton) 패턴 구현 깨트리는 방법 1
- 리플렉션을 사용한다면?
public class App {

    public static void main(String[] args) throws IOException, ClassNotFoundException {
        Settings settings = Settings.getInstance();
        Constructor<Settings> declaredConstructor = Settings.class.getDeclaredConstructor();
        declaredConstructor.setAccessible(true);
        Settings settings1 = declaredConstructor.newInstance();
        System.out.println(settings == settings1);
    }

}
- 리플렉션에 대해 설명하세요
- 구체적인 클래스 타입을 알지 못해도, 그 클래스의 메서드, 타입, 변수들에 접근할 수 있도록 해주는 자바 API
- setAccessible(true)를 사용하는 이유는?
- private 생성자에 접근하기 위한 목적이다.
싱글톤 (Singleton) 패턴 구현 깨트리는 방법 2
- 직렬화 & 역직렬화를 사용한다면?
public class App {

    public static void main(String[] args) throws IOException, ClassNotFoundException {
        Settings5 settings = Settings5.INSTANCE;

        Settings5 settings1 = null;
        try (ObjectOutput out = new ObjectOutputStream(new FileOutputStream("settings.obj"))) {
            out.writeObject(settings);
        }

        try (ObjectInput in = new ObjectInputStream(new FileInputStream("settings.obj"))) {
            settings1 = (Settings5) in.readObject();
        }

        System.out.println(settings == settings1);
    }

}
- 자바의 직렬화 & 역직렬화에 대해 설명하세요
- 직렬화: 자바 시스템 내부에서 사용되는 객체 또는 데이터를 바이트(byte) 형태로 변환
- 역직렬화: 바이트로 변환된 데이터를 다시 객체로 변환
- SerializableId란 무엇이며 왜 쓰는가?
- 직렬화된 클래스의 버전을 기억하여 로드된 클래스와 직렬화된 객체가 호환되는지 확인한다.
- SerializableId가 다르면 역직렬화 할 수 없다.
- try-resource 블럭에 대해 설명하세요.
- try 코드 블럭이 끝나면 자동으로 자원을 종료해주기 때문에 명시적으로 자원 반환을 하지 않아도 된다.
싱글톤 (Singleton) 패턴 구현 방법 6
- enum을 사용하는 방법
- 권장하는 방법중 하나.
/**
 * Enum을 사용해서 싱글톤 만들기
 */
public enum Settings5 {

    INSTANCE;

}
- enum 타입의 인스턴스를 리팩토링을 만들 수 있는가?
- 만들 수 없다. enum 타입의 클래스는 리플랙션을 통해 만들 수 없도록 제한한다.
- enum으로 싱글톤 타입을 구현할 때의 단점은?
- 단점은 이른 초기화와 같이 미리 만들어진다는 것이다. 그리고 상속을 사용할 수 없다.
- 직렬화 & 역직렬화 시에 별도로 구현해야 하는 메소드가 있는가?
- 별다른 장치가 없어도 Enum 클래스는 직렬화 & 역직렬화가 된다. 그러나 getResolves() 구현시 역직렬화시 변경을 가할 수 있다.
실무에서는 어떻게 쓰이나?
- 스프링에서 빈의 스코프 중에 하나로 싱글톤 스코프
- 자바의 java.lang.Runtime
- 다른 디자인 패턴(빌더, 퍼사드, 추상 팩토리 등) 구현체의 일부로 쓰이기도 한다.
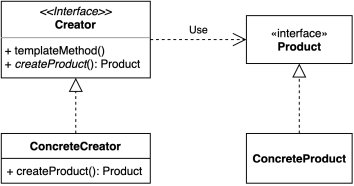
팩토리 메소드 (Factory method) 패턴
- 구체적으로 어떤 인스턴스를 만들지는 서브 클래스가 정한다.
- 다양한 구현체(Product)가 있고, 그중에서 특정한 구현체를 만들 수 있는 다양한 팩토리(Creator)를 제공할 수 있다.
팩토리 메소드 (Factory method) 패턴 구현 방법
- 확장에 열려있고 변경에 닫혀있는 구조로 만들어 보자.
기존
- Ship.class
  public class Ship {

      private String name;

      private String color;

      private String logo;

      public String getName() {
          return name;
      }

      public void setName(String name) {
          this.name = name;
      }

      public String getColor() {
          return color;
      }

      public void setColor(String color) {
          this.color = color;
      }

      public String getLogo() {
          return logo;
      }

      public void setLogo(String logo) {
          this.logo = logo;
      }

      @Override
      public String toString() {
          return "Ship{" +
                  "name='" + name + '\'' +
                  ", color='" + color + '\'' +
                  ", logo='" + logo + '\'' +
                  '}';
      }
  }
- ShipFactory.Class
  public class ShipFactory {

    public static Ship orderShip(String name, String email) {
      // validate
      if (name == null || name.isBlank()) {
        throw new IllegalArgumentException("배 이름을 지어주세요.");
      }
      if (email == null || email.isBlank()) {
        throw new IllegalArgumentException("연락처를 남겨주세요.");
      }

      prepareFor(name);

      Ship ship = new Ship();
      ship.setName(name);

      // Customizing for specific name
      if (name.equalsIgnoreCase("whiteship")) {
        ship.setLogo("\uD83D\uDEE5️");
      } else if (name.equalsIgnoreCase("blackship")) {
        ship.setLogo("⚓");
      }

      // coloring
      if (name.equalsIgnoreCase("whiteship")) {
        ship.setColor("whiteship");
      } else if (name.equalsIgnoreCase("blackship")) {
        ship.setColor("black");
      }

      // notify
      sendEmailTo(email, ship);

      return ship;
    }

    private static void prepareFor(String name) {
      System.out.println(name + " 만들 준비 중");
    }

    private static void sendEmailTo(String email, Ship ship) {
      System.out.println(ship.getName() + " 다 만들었습니다.");
    }

  }
- Client.Class
  public class Client {

      public static void main(String[] args) {
          Ship whiteship = ShipFactory.orderShip("Whiteship", "test@mail.com");
          System.out.println(whiteship);

          Ship blackship = ShipFactory.orderShip("Blackship", "test@mail.com");
          System.out.println(blackship);
      }

  }
변경
- ShipFactory.class
  public interface ShipFactory {

      default Ship orderShip(String name, String email) {
          validate(name, email);
          prepareFor(name);
          Ship ship = createShip();
          sendEmailTo(email, ship);
          return ship;
      }

      void sendEmailTo(String email, Ship ship);

      Ship createShip();

      private void validate(String name, String email) {
          if (name == null || name.isBlank()) {
              throw new IllegalArgumentException("배 이름을 지어주세요.");
          }
          if (email == null || email.isBlank()) {
              throw new IllegalArgumentException("연락처를 남겨주세요.");
          }
      }

      private void prepareFor(String name) {
          System.out.println(name + " 만들 준비 중");
      }

  }
- DefaultShipFactory.class
  public abstract class DefaultShipFactory implements ShipFactory {

      @Override
      public void sendEmailTo(String email, Ship ship) {
          System.out.println(ship.getName() + " 다 만들었습니다.");
      }

  }
- WhiteshipFactory.class
  public class WhiteshipFactory extends DefaultShipFactory {

      @Override
      public Ship createShip() {
          return new Whiteship();
      }
  }
- Ship.class
  public class Ship {

      private String name;

      private String color;

      private String logo;

      private Wheel wheel;

      private Anchor anchor;

      public String getName() {
          return name;
      }

      public void setName(String name) {
          this.name = name;
      }

      public String getColor() {
          return color;
      }

      public void setColor(String color) {
          this.color = color;
      }

      public String getLogo() {
          return logo;
      }

      public void setLogo(String logo) {
          this.logo = logo;
      }

      @Override
      public String toString() {
          return "Ship{" +
                  "name='" + name + '\'' +
                  ", color='" + color + '\'' +
                  ", logo='" + logo + '\'' +
                  '}';
      }

      public Wheel getWheel() {
          return wheel;
      }

      public void setWheel(Wheel wheel) {
          this.wheel = wheel;
      }

      public Anchor getAnchor() {
          return anchor;
      }

      public void setAnchor(Anchor anchor) {
          this.anchor = anchor;
      }
  }
- Whiteship.class
  public class Whiteship extends Ship {

      public Whiteship() {
          setName("whiteship");
          setLogo("\uD83D\uDEE5️");
          setColor("white");
      }
  }
- BlackshipFactory.class
  public class BlackshipFactory extends DefaultShipFactory {
      @Override
      public Ship createShip() {
          return new Blackship();
      }
  }
- Blackship.class
  public class Blackship extends Ship {

      public Blackship() {
          setName("blackship");
          setColor("black");
          setLogo("⚓");
      }
  }
- Client.class
  public class Client {

      public static void main(String[] args) {
          Client client = new Client();
          client.print(new WhiteshipFactory(), "whiteship", "test@mail.com");
          client.print(new BlackshipFactory(), "blackship", "test@mail.com");
      }

      private void print(ShipFactory shipFactory, String name, String email) {
          System.out.println(shipFactory.orderShip(name, email));
      }

  }
팩토리 메소드 (Factory method) 패턴 복습
- 구체적으로 어떤 것을 만들지는 서브 클래스가 정한다.
- 질문
- 팩토리 메소드 패턴을 적용했을 때의 장점은? 단점은?
- 장점 : 확장에 열려있고 변경에 닫혀있는 객체 지향 원칙을 적용해서 기존 코드를 변경하지 않고 새로운 인스턴스를 다른 방법으로 확장이 가능하다
- 단점 : 클래스가 많아 진다.
- “확장에 열려있고 변경에 닫혀있는 객체 지향 원칙”을 설명하세요
- 기존 코드를 변경하지 않으면서 새로운 기능을 확장할 수 있는 구조를 만드는 것
- 자바 8에 추가된 default 메소드에 대해 설명하세요.
- 인터페이스에서 기본적인 구현체를 만들 수 있다.
- 팩토리 메소드 패턴을 적용했을 때의 장점은? 단점은?
실무에서는 어떻게 쓰이나?
- 단순한 팩토리 패턴
- 매개변수의 값에 따라 또는 메소드에 따라 각기 다른 인스턴스를 리턴하는 단순한 버전의 팩토리 패턴
- java.lang.Calendar 또는 java.lang.NumberFormat
  public class SimpleFactory {

      public Object createProduct(String name) {
          if (name.equals("whiteship")) {
              return new Whiteship();
          } else if (name.equals("blackship")) {
              return new Blackship();
          }

          throw new IllegalArgumentException();
      }
  }
  public class CalendarExample {

      public static void main(String[] args) {
          System.out.println(Calendar.getInstance().getClass());
          System.out.println(Calendar.getInstance(Locale.forLanguageTag("th-TH-x-lvariant-TH")).getClass());
          System.out.println(Calendar.getInstance(Locale.forLanguageTag("ja-JP-x-lvariant-JP")).getClass());
      }
  }
- 스프링 BeanFactory
- Object 타입의 Product를 만드는 BeanFactory라는 Creator
  public class SpringBeanFactoryExample {

    public static void main(String[] args) {
        BeanFactory xmlFactory = new ClassPathXmlApplicationContext("config.xml");
        String hello = xmlFactory.getBean("hello", String.class);
        System.out.println(hello);

        BeanFactory javaFactory = new AnnotationConfigApplicationContext(Config.class);
        String hi = javaFactory.getBean("hello", String.class);
        System.out.println(hi);
    }
  }
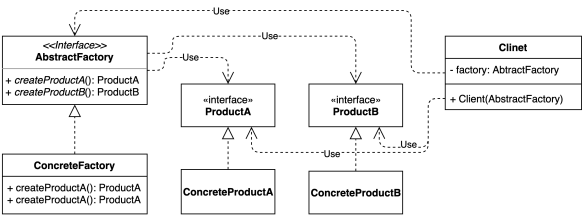
추상 팩토리 (Abstract factory) 패턴
- 서로 관련있는 여러 객체를 만들어주는 인터페이스
- 구체적으로 어떤 클래스의 인스턴스를(concrete product)를 사용하는지 감출 수 있다.
추상 팩토리 (Abstract factory) 구현 방법
- 클라이언트 코드에서 구체적인 클래스의 의존성을 제거한다.
기존
- Anchor.class
  public interface Anchor {

  }
- WhiteAnchor.class
  public class WhiteAnchor implements Anchor {
  }
- Wheel.class
  public interface Wheel {

  }
- WhiteWheel.class
  public class WhiteWheel implements Wheel {
  }
- WhiteshipFactory.java
  public class WhiteshipFactory extends DefaultShipFactory {

      @Override
      public Ship createShip() {
          Ship ship = new Whiteship();
          ship.setAnchor(new WhiteAnchor());
          ship.setWheel(new WhiteWheel());
          return ship;
      }
  }
변경
- WhiteAnchorPro.class
  public class WhiteAnchorPro implements Anchor{

  }
- WhiteWheelPro.class
  public class WhiteWheelPro implements Wheel {
  }
- ShipPartsFactory.class
  public interface ShipPartsFactory {
      Anchor createAnchor();
      Wheel createWheel();
  }
- WhiteshipPartsFactory.class
  public class WhiteshipPartsFactory implements ShipPartsFactory {

      @Override
      public Anchor createAnchor() {
          return new WhiteAnchor();
      }

      @Override
      public Wheel createWheel() {
          return new WhiteWheel();
      }
  }
- WhitePartsProFactory.class
public class WhitePartsProFactory implements ShipPartsFactory {
  @Override
  public Anchor createAnchor() {
    return new WhiteAnchorPro();
  }

  @Override
  public Wheel createWheel() {
    return new WhiteWheelPro();
  }
}
- WhiteshipFactory.class
public class WhiteshipFactory extends DefaultShipFactory {

    private ShipPartsFactory shipPartsFactory;

    public WhiteshipFactory(ShipPartsFactory shipPartsFactory){
        this.shipPartsFactory = shipPartsFactory;
    }

    @Override
    public Ship createShip() {
      Ship ship = new Whiteship();
      ship.setAnchor(shipPartsFactory.createAnchor());
      ship.setWheel(shipPartsFactory.createWheel());
      return ship;
    }

}
- ShipInventory.class
public class ShipInventory {

    public static void main(String[] args) {
        ShipFactory shipFactory = new WhiteshipFactory(new WhiteshipPartsFactory());
        Ship ship = shipFactory.createShip();
        System.out.println(ship.getAnchor().getClass());
        System.out.println(ship.getWheel().getClass());
    }
}
추상 팩토리 (Abstract factory) 복습
- 팩토리 메소드 패턴과 굉장히 흡사한데 무엇이 다른건가.
- 모양과 효과는 비슷하지만
- 둘 다 구체적인 객체 생성 과정을 추상화한 인터페이스를 제공한다.
- 관점이 다르다.
- 팩토리 메소드 패턴은 “팩토리를 구현하는 방법 (inheritance)” 에 초점을 둔다.
- 추상 팩토리 패턴은 “팩토리를 사용하는 방법 (composition)” 에 초점을 둔다.
- 목적이 조금 다르다.
- 팩토리 메소드 패턴은 구체적인 객체 생성 과정을 하위 또는 구체적인 클래스로 옮기는 것이 목적.
- 추상 팩토리 패턴은 관련 있는 여러 객체를 구체적인 클래스에 의존하지 않고 만들 수 있게 해주는 것이 목적
- 모양과 효과는 비슷하지만
실무에서는 어떻게 쓰이나?
- 자바 라이브러리
- javax.xml.xpath.XPathFactory#newInstance()
- javax.xml.transform.TransformerFactory#newInstance()
- javax.xml.parsers.DocumentBuilderFactory#newInstance()
public class DocumentBuilderFactoryExample {

  public static void main(String[] args) throws ParserConfigurationException, IOException, SAXException {

      DocumentBuilderFactory factory = DocumentBuilderFactory.newInstance();
      DocumentBuilder builder = factory.newDocumentBuiler();

      Document document = builder.parse(new File("src/main/resources/config.xml"));
      System.out.println(document.getDocumentElement());

  }

}
- 스프링
- FactoryBean과 그 구현체
public class ShipFactory implements FactoryBean<Ship> {

    @Override
    public Ship getObject() throws Exception {
        Ship ship = Whiteship();
        ship.setName("whiteship");
        return ship;
    }

    @Override
    public Class<?> getObjectType() {
      return Ship.class;
    }
}
@Configuration
public class FactoryBeanConfig {

    @Bean
    public ShipFactory shipFactory() {
        return new ShipFactory();
    }
}
public class FactoryBeanExample {

    public static void main(String[] args) {

        //xml
        ApplicationContext applicationContext = new ClassPathXmlApplicationContext("config.xml");
        Ship whiteship = applicationContext.getBean("whiteship", Ship.class);
        System.out.println(whiteship.getName());

        //java
        ApplicationContext applicationContext2 = new AnnotationConfigApplicationContext(FactoryBeanConfig.class);
        Ship bean = applicationContext2.getBean(Ship.class);
        System.out.println(bean);
    }
}
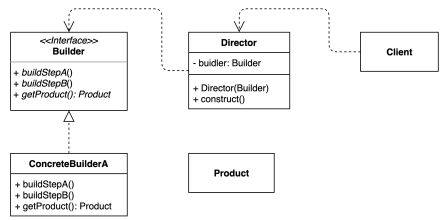
빌더 (Builder) 패턴
- 동일한 프로세스를 거쳐 다양한 구성의 인스턴스를 만드는 방법
- (복잡한) 객체를 만드는 프로세스를 독립적으로 분리할 수 있다.
빌더 (Builder) 패턴 구현 방법
기존
- TourPlan.class
public class TourPlan {

    private String title;

    private int nights;

    private int days;

    private LocalDate startDate;

    private String whereToStay;

    private List<DetailPlan> plans;

    public TourPlan() {
    }

    public TourPlan(String title, int nights, int days, LocalDate startDate, String whereToStay, List<DetailPlan> plans) {
        this.title = title;
        this.nights = nights;
        this.days = days;
        this.startDate = startDate;
        this.whereToStay = whereToStay;
        this.plans = plans;
    }

    @Override
    public String toString() {
        return "TourPlan{" +
                "title='" + title + '\'' +
                ", nights=" + nights +
                ", days=" + days +
                ", startDate=" + startDate +
                ", whereToStay='" + whereToStay + '\'' +
                ", plans=" + plans +
                '}';
    }

    public String getTitle() {
        return title;
    }

    public void setTitle(String title) {
        this.title = title;
    }

    public int getNights() {
        return nights;
    }

    public void setNights(int nights) {
        this.nights = nights;
    }

    public int getDays() {
        return days;
    }

    public void setDays(int days) {
        this.days = days;
    }

    public LocalDate getStartDate() {
        return startDate;
    }

    public void setStartDate(LocalDate startDate) {
        this.startDate = startDate;
    }

    public String getWhereToStay() {
        return whereToStay;
    }

    public void setWhereToStay(String whereToStay) {
        this.whereToStay = whereToStay;
    }

    public List<DetailPlan> getPlans() {
        return plans;
    }

    public void setPlans(List<DetailPlan> plans) {
        this.plans = plans;
    }

    public void addPlan(int day, String plan) {
        this.plans.add(new DetailPlan(day, plan));
    }
}
- DetailPlan.class
public class DetailPlan {

    private int day;

    private String plan;

    public DetailPlan(int day, String plan) {
        this.day = day;
        this.plan = plan;
    }

    public int getDay() {
        return day;
    }

    public void setDay(int day) {
        this.day = day;
    }

    public String getPlan() {
        return plan;
    }

    public void setPlan(String plan) {
        this.plan = plan;
    }

    @Override
    public String toString() {
        return "DetailPlan{" +
                "day=" + day +
                ", plan='" + plan + '\'' +
                '}';
    }
}
- App.class
public class App {

    public static void main(String[] args) {
        TourPlan shortTrip = new TourPlan();
        shortTrip.setTitle("오레곤 롱비치 여행");
        shortTrip.setStartDate(LocalDate.of(2021, 7, 15));


        TourPlan tourPlan = new TourPlan();
        tourPlan.setTitle("칸쿤 여행");
        tourPlan.setNights(2);
        tourPlan.setDays(3);
        tourPlan.setStartDate(LocalDate.of(2020, 12, 9));
        tourPlan.setWhereToStay("리조트");
        tourPlan.addPlan(0, "체크인 이후 짐풀기");
        tourPlan.addPlan(0, "저녁 식사");
        tourPlan.addPlan(1, "조식 부페에서 식사");
        tourPlan.addPlan(1, "해변가 산책");
        tourPlan.addPlan(1, "점심은 수영장 근처 음식점에서 먹기");
        tourPlan.addPlan(1, "리조트 수영장에서 놀기");
        tourPlan.addPlan(1, "저녁은 BBQ 식당에서 스테이크");
        tourPlan.addPlan(2, "조식 부페에서 식사");
        tourPlan.addPlan(2, "체크아웃");
    }
}
변경
- TourPlanBuilder.class
public interface TourPlanBuilder {

  TourPlanBuilder nightsAndDays(int nights, int days);

  TourPlanBuilder title(String title);

  TourPlanBuilder startDate(LocalDate localDate);

  TourPlanBuilder whereToStay(String whereToStay);

  TourPlanBuilder addPlan(int day, String plan);

  TourPlan getPlan();

}
- DefaultTourBuilder.class
public class DefaultTourBuilder implements TourPlanBuilder {

  private String title;

  private int nights;

  private int days;

  private LocalDate startDate;

  private String whereToStay;

  private List<DetailPlan> plans;

  @Override
  public TourPlanBuilder nightsAndDays(int nights, int days) {
    this.nights = nights;
    this.days = days;
    return this;
  }

  @Override
  public TourPlanBuilder title(String title) {
    this.title = title;
    return this;
  }

  @Override
  public TourPlanBuilder startDate(LocalDate startDate) {
    this.startDate = startDate;
    return this;
  }

  @Override
  public TourPlanBuilder whereToStay(String whereToStay) {
    this.whereToStay = whereToStay;
    return this;
  }

  @Override
  public TourPlanBuilder addPlan(int day, String plan) {
    if (this.plans == null) {
      this.plans = new ArrayList<>();
    }

    this.plans.add(new DetailPlan(day, plan));
    return this;
  }

  @Override
  public TourPlan getPlan() {
    return new TourPlan(title, nights, days, startDate, whereToStay, plans);
  }

}
- TourDirector.class
public class TourDirector {

  private TourPlanBuilder tourPlanBuilder;

  public TourDirector(TourPlanBuilder tourPlanBuilder) {
    this.tourPlanBuilder = tourPlanBuilder;
  }

  public TourPlan cancunTrip() {
    return tourPlanBuilder.title("칸쿤 여행")
            .nightsAndDays(2, 3)
            .startDate(LocalDate.of(2020, 12, 9))
            .whereToStay("리조트")
            .addPlan(0, "체크인하고 짐 풀기")
            .addPlan(0, "저녁 식사")
            .getPlan();
  }

  public TourPlan longBeachTrip() {
    return tourPlanBuilder.title("롱비치")
            .startDate(LocalDate.of(2021, 7, 15))
            .getPlan();
  }

}
- App.class
public class App {

    public static void main(String[] args) {
        TourDirector director = new TourDirector(new DefaultTourBuilder());
        TourPlan tourPlan = director.cancunTrip();
        TourPlan tourPlan1 = director.longBeachTrip();
    }
}
빌더 (Builder) 패턴 구현 복습
- 장점
- 만들기 복잡한 객체를 순차적으로 만들 수 있다.
- 복잡한 객체를 만드는 구체적인 과정을 숨길 수 있다.
- 동일한 프로세스를 통해 각기 다르게 구성된 객체를 만들 수도 있다.
- 불완전한 객체를 사용하지 못하도록 방지할 수 있다.
- 단점
- 원하는 객체를 만들려면 빌더부터 만들어야 한다.
- 구조가 복잡해 진다. (트래이드 오프)
실무에서 어떻게 쓰이나?
- 자바 8 Stream.Builder API
public class StreamExample {

    public static void main(String[] args) {
        Stream<String> names = Stream.<String>builder().add("keesun").add("whiteship").build();
        names.forEach(System.out::println);
    }
}
- SpringBuilder
public class StringBuilderExample {

    public static void main(String[] args) {
        StringBuilder stringBuilder = new StringBuilder();
        String result = stringBuilder.append("whiteship").append("test").toString();
        System.out.println(result);
    }
}
- 롬복의 @Builder
@Builder
public class LombokExample {

    private String title;

    private int nights;

    private int days;

    public static void main(String[] args) {
        LombokExample trip = LombokExample.builder()
                .title("여행")
                .nights(2)
                .days(3)
                .build();
    }

}
- 스프링
- UriComponentsBuilder
- MockMvcWebClientBuilder
- …Builder
public class SpringExample {

    public static void main(String[] args) {
        UriComponents howToStudyJava = UriComponentsBuilder.newInstance()
                .scheme("http")
                .host("www.test.ac.kr")
                .path("java playlist ep1")
                .build().encode();
        System.out.println(howToStudyJava);
    }
}
프로토타입 (Prototype) 패턴
- 기존의 인스턴스를 복제하여 새로운 인스턴스를 만드는 방법
- 복제 기능을 갖추고 있는 기존 인스턴스를 프로토타입으로 사용해 새 인스턴스를 만들 수 있다.
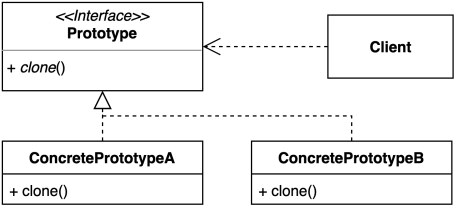
프로토타입 (Prototype) 패턴 구현 방법
기존
- GithubRepository.class
public class GithubRepository {

    private String user;

    private String name;

    public String getUser() {
        return user;
    }

    public void setUser(String user) {
        this.user = user;
    }

    public String getName() {
        return name;
    }

    public void setName(String name) {
        this.name = name;
    }
}
- GithubIssue.class
public class GithubIssue {

    private int id;

    private String title;

    private GithubRepository repository;

    public GithubIssue(GithubRepository repository) {
        this.repository = repository;
    }

    public int getId() {
        return id;
    }

    public void setId(int id) {
        this.id = id;
    }

    public String getTitle() {
        return title;
    }

    public void setTitle(String title) {
        this.title = title;
    }

    public GithubRepository getRepository() {
        return repository;
    }

    public String getUrl() {
        return String.format("https://github.com/%s/%s/issues/%d",
                repository.getUser(),
                repository.getName(),
                this.getId());
    }
}
- App.class
public class App {

    public static void main(String[] args) {
        GithubRepository repository = new GithubRepository();
        repository.setUser("whiteship");
        repository.setName("live-study");

        GithubIssue githubIssue = new GithubIssue(repository);
        githubIssue.setId(1);
        githubIssue.setTitle("1주차 과제: JVM은 무엇이며 자바 코드는 어떻게 실행하는 것인가.");

        String url = githubIssue.getUrl();
        System.out.println(url);
    }

}
변경
- GithubIssue.class
public class GithubIssue implements Cloneable {

    private int id;

    private String title;

    private GithubRepository repository;

    public GithubIssue(GithubRepository repository) {
        this.repository = repository;
    }

    public int getId() {
        return id;
    }

    public void setId(int id) {
        this.id = id;
    }

    public String getTitle() {
        return title;
    }

    public void setTitle(String title) {
        this.title = title;
    }

    public GithubRepository getRepository() {
        return repository;
    }

    public String getUrl() {
        return String.format("https://github.com/%s/%s/issues/%d",
                repository.getUser(),
                repository.getName(),
                this.getId());
    }

    @Override
    protected Object clone() throws CloneNotSupportedException {
        GithubRepository repository = new GithubRepository();
        repository.setUser(this.repository.getUser());
        repository.setName(this.repository.getName());

        GithubIssue githubIssue = new GithubIssue(repository);
        githubIssue.setId(this.id);
        githubIssue.setTitle(this.title);

        return githubIssue;
    }

    @Override
    public boolean equals(Object o) {
        if (this == o) return true;
        if (o == null || getClass() != o.getClass()) return false;
        GithubIssue that = (GithubIssue) o;
        return id == that.id && Objects.equals(title, that.title) && Objects.equals(repository, that.repository);
    }

    @Override
    public int hashCode() {
        return Objects.hash(id, title, repository);
    }
}
- App.class
public class App {

    public static void main(String[] args) throws CloneNotSupportedException {
        GithubRepository repository = new GithubRepository();
        repository.setUser("whiteship");
        repository.setName("live-study");

        GithubIssue githubIssue = new GithubIssue(repository);
        githubIssue.setId(1);
        githubIssue.setTitle("1주차 과제: JVM은 무엇이며 자바 코드는 어떻게 실행하는 것인가.");

        String url = githubIssue.getUrl();
        System.out.println(url);

        GithubIssue clone = (GithubIssue) githubIssue.clone();
        System.out.println(clone.getUrl());

        repository.setUser("test");

        System.out.println(clone != githubIssue);
        System.out.println(clone.equals(githubIssue));
        System.out.println(clone.getClass() == githubIssue.getClass());
        System.out.println(clone.getRepository() == githubIssue.getRepository());

        System.out.println(clone.getUrl());
    }

}
프로토타입 (Prototype) 패턴 구현 복습
- 장점
- 복잡한 객체를 만드는 과정을 숨길 수 있다.
- 기존 객체를 복제하는 과정이 새 인스턴스를 만드는 것보다 비용(시간 또는 메모리)적인 면에서 효율적일 수도 있다.
- 추상적인 타입을 리턴할 수 있다.
- 단점
- 복제한 객체를 만드는 과정 자체가 복잡할 수 있다. (특히, 순환 참조가 있는 경우)
실무에서 어떻게 쓰이나?
- 자바 Object 클래스의 clone 메소드와 Cloneable 인터페이스
- shallow copy와 deep copy
- ModelMapper
public class ModelMapperExample {

    public static void main(String[] args) {
        GithubRepository repository = new GithubRepository();
        repository.setUser("whiteship");
        repository.setName("live-study");

        GithubIssue githubIssue = new GithubIssue(repository);
        githubIssue.setId(1);
        githubIssue.setTitle("1주차 과제: JVM은 무엇이며 자바 코드는 어떻게 실행하는 것인가.");

        ModelMapper modelMapper = new ModelMapper();
        GithubIssueData githubIssueData = modelMapper.map(githubIssue, GithubIssueData.class);
        System.out.println(githubIssueData);
    }
}
public class JavaCollectionExample {

    public static void main(String[] args) {
        Student keesun = new Student("test");
        Student whiteship = new Student("whiteship");
        List<Student> students = new ArrayList<>();
        students.add(keesun);
        students.add(whiteship);

        List<Student> clone = new ArrayList<>(students);
        System.out.println(clone);
    }
}